Welcome, digital artists! In this tutorial, we'll help you get started with Midjourney AI, one of the most popular text-to-image AI generators available today. The onboarding takes just 5-15 minutes to sign in and pick a subscription plan, after which you'll be ready to create images yourself or with one of our Prompt Builders right away.
Choose your platform to get started:
Video guide "Starting Midjourney in 2026? Here's Your Complete Beginner's Roadmap"
Onboarding
Step 1. Register and log in
Go to the Midjourney website and click Sign Up. To use Midjourney on its official website, you'll need either a Google account or a Discord account. Currently, you cannot sign up using just your email or other registration methods.

Midjourney Website - Home Page (for users who are not logged in)

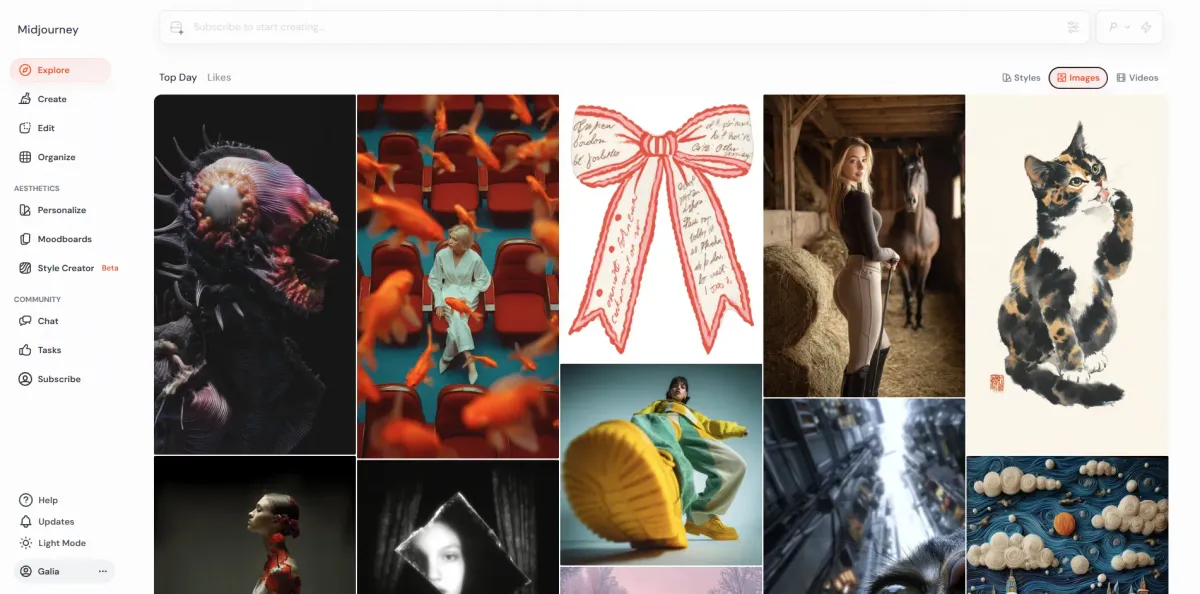
Choose either Google or Discord and log in. Once signed in, you'll land on the Explore tab, where you can get inspired by other users' creations and browse a huge style library - definitely worth exploring.

Explore Tab Overview
Step 2. Subscribe
Midjourney is a paid AI tool. However, you can currently create images and even videos for free on Meta.ai, though with certain limitations compared to the official website version. Learn more in the Midjourney on Meta tab above.
To use Midjourney at full capacity with the best possible user interface, you need to choose a subscription plan. There are four subscription tiers available:

Midjourney Subscription Plans
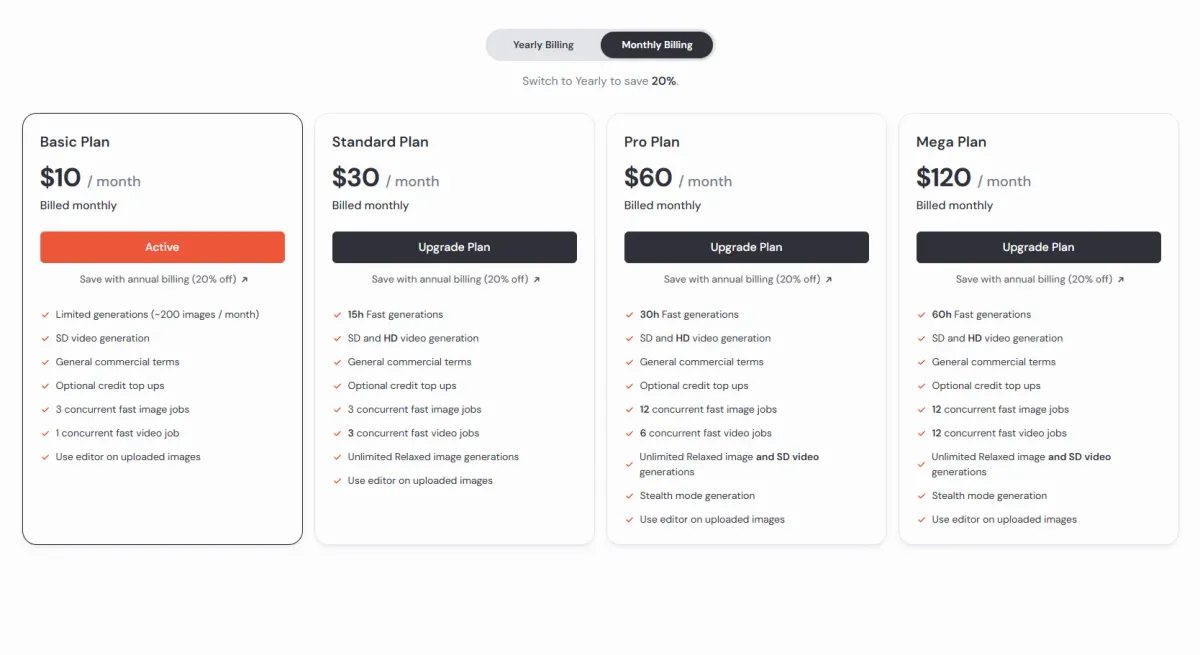
If you're a Midjourney beginner, we recommend starting with the Basic plan for your first month, as it includes all the features you need. To learn more about choosing the right plan and getting free generations, check out our Midjourney Subscriptions Explained guide. If you plan to use Midjourney frequently and want to maximize your first month, this guide is essential.
Step 3. Start Creating
You're almost there! To create your first image, type a prompt in the field at the top of the screen. When you press Enter (or Return on Mac), you'll be prompted to accept the Terms of Service. You must accept these terms before you can generate any images.

Write Your Prompt Here

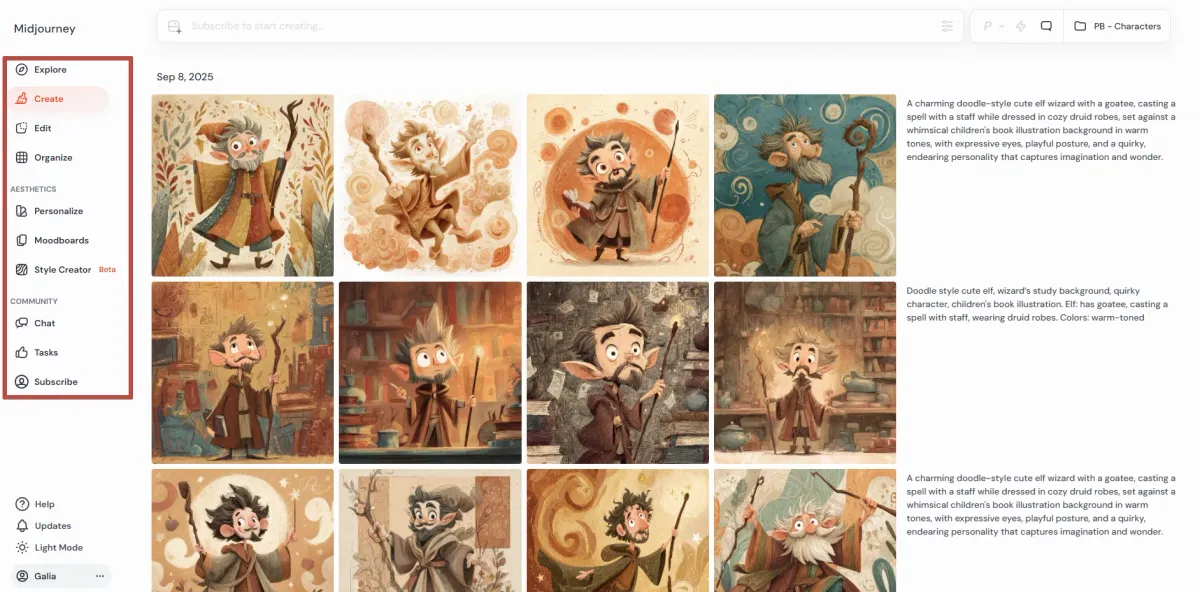
Once accepted, head over to the Create tab to see your images. They will be generated in grids of four (currently, you cannot change the number of generated images per grid).
Congrats! You're ready to use your Prompt Builder if you've already purchased one. Just make your selections in the dropdown lists, copy the generated prompt, and paste it into the Midjourney prompt field.
Commercial Rights
With Midjourney, you own all the images and videos you create, even if you cancel your subscription. Feel free to use them however you like. However, if you upscale an image that another user created, that image belongs to the original creator, not you.
Be especially careful when creating images that resemble famous people or include content that might violate local laws, platform rules, content restrictions, or other people's and companies' intellectual property rights.
Midjourney Important Facts
- The default square image size is 1024 × 1024 px. Vertical aspect ratios have greater height but smaller width; horizontal images are the opposite. This is not modifiable, but you can upscale images after creating the initial grid.
- SD videos are generated in 480p quality; HD videos are 720p quality.
- Midjourney does not currently support transparent backgrounds.
- Videos currently have no sound.
- Images created on Discord are visible on the Midjourney website, but the reverse isn't true - website images don't appear on Discord. Images created on Meta are not visible on the Midjourney website and vice versa, as you're using different accounts on these platforms.
Useful Links
- 📢 Announcements for updates and news
- 🛠 Status to check for technical issues
- 📚 Official Midjourney guides and documentation
- 💰 Midjourney Subscription Plans
What Can Midjourney Do?
In this section, we'll briefly cover what Midjourney can do today. Hopefully, some of these features will help you create even better images. Here's a quick overview of available functions in Midjourney today:
- Creating images, including those based on various reference images (generic, style, and character references), as well as with your own or others' personalization preferences
- Creating videos using an image-to-video model, with any image as your starting frame
- Upscaling images created in Midjourney
- Editing any images, including inpainting, outpainting, and correcting small flaws
- Creating images of consistent characters
- Creating images in a coherent style
- Organizing your creations in folders
- Get free GPU time
- Experimenting infinitely with style via prompt text, style reference images, codes, moodboards, and personalization
- Joining the community and completing tasks to earn free generations

What Midjourney Can Do
If you're new to Midjourney or still choosing which AI tool to use for your creative projects, we recommend watching our guide What You Can Create With Midjourney. You'll explore Midjourney's main capabilities and limitations, helping you decide whether it's the best tool for you.
Now, let's learn about the main features available on the Midjourney website. We'll navigate using the tab bar on the left side of the screen.
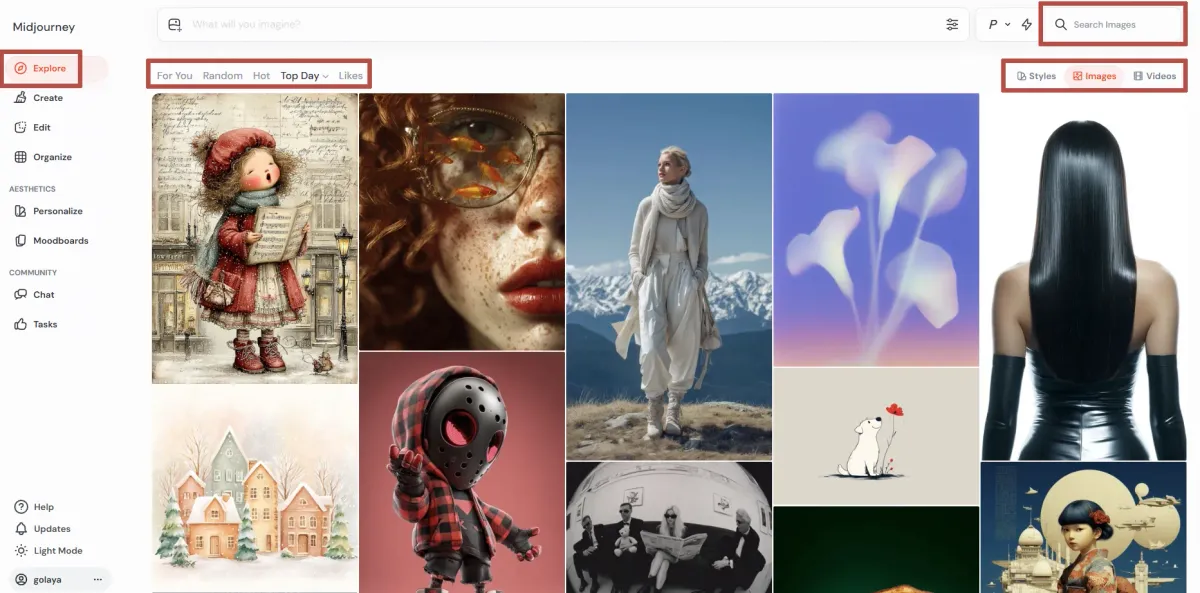
EXPLORE Tab
On the top right, you can choose what you're interested in today: Images, Videos, or Styles. Select a section, then look at the top left to filter results by specific criteria. There's also a Search field on the top right where you can type anything you'd like to find. For example, you can search for website interface images, gothic-style artwork, or Christmas clipart. This gives you a general understanding of how Midjourney handles different types of tasks.
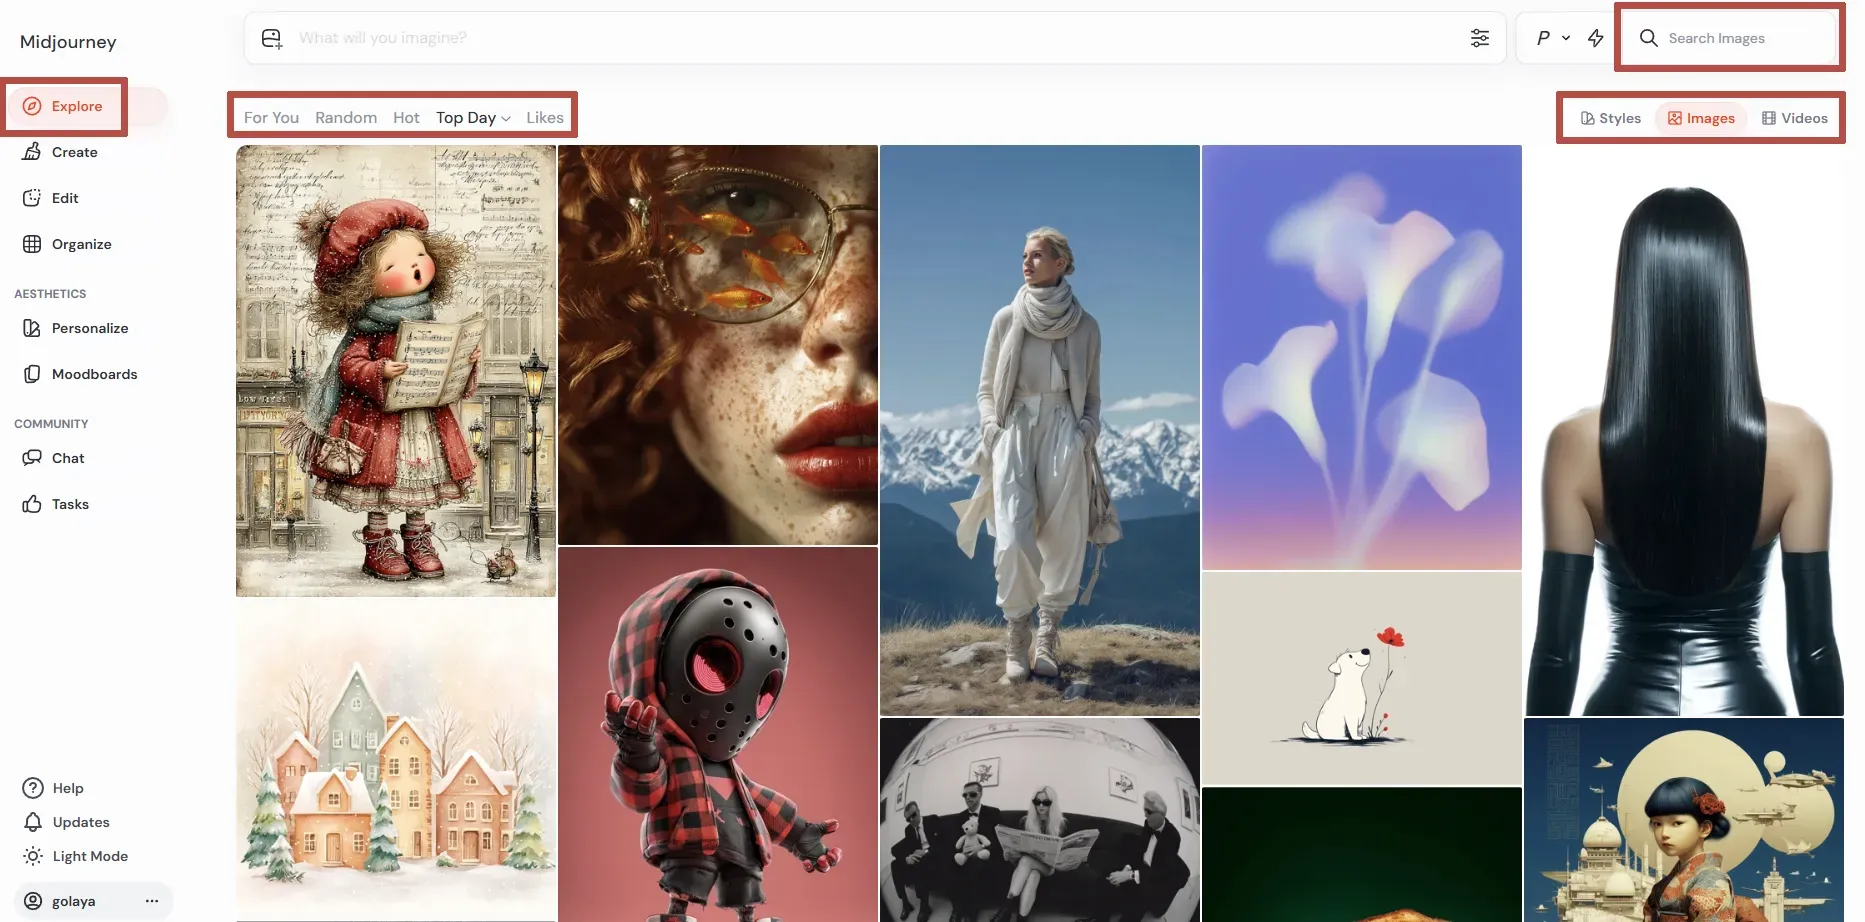
Explore Tab Overview
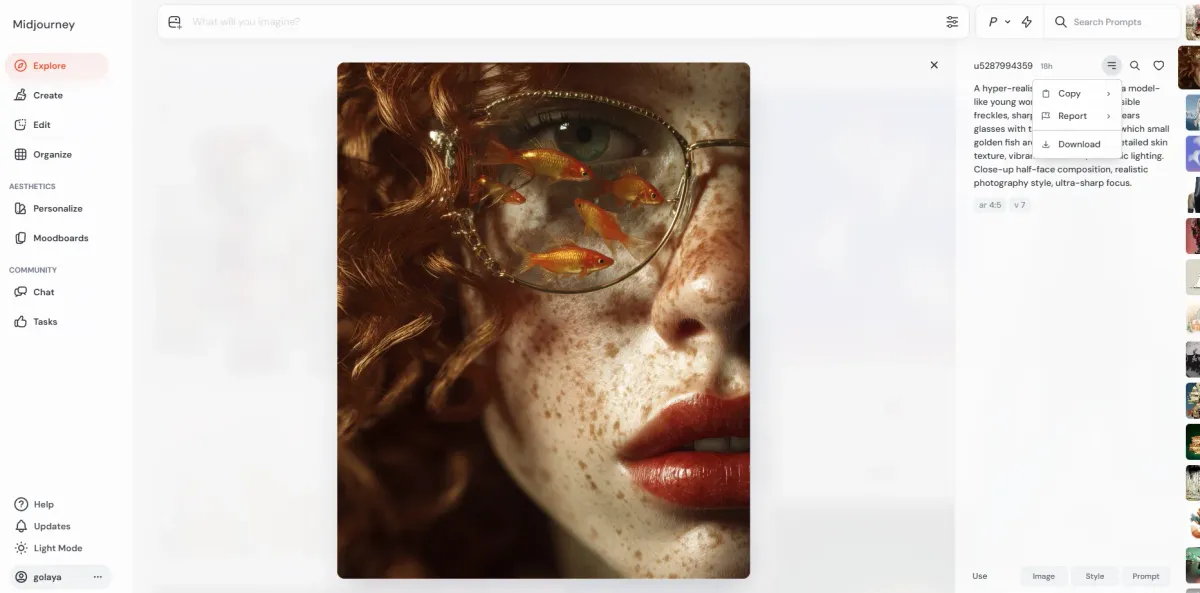
How to use the images?
The Explore tab's real value is in seeing other people's creations, getting inspiration, and learning from them. For example, click on one of the images. You can see the prompt used, as well as the parameters (e.g., --ar 4:5, --v 7). Use the Menu button to copy the prompt, Job ID, image URL, or the image itself.

Explore Tab - How to Use Images
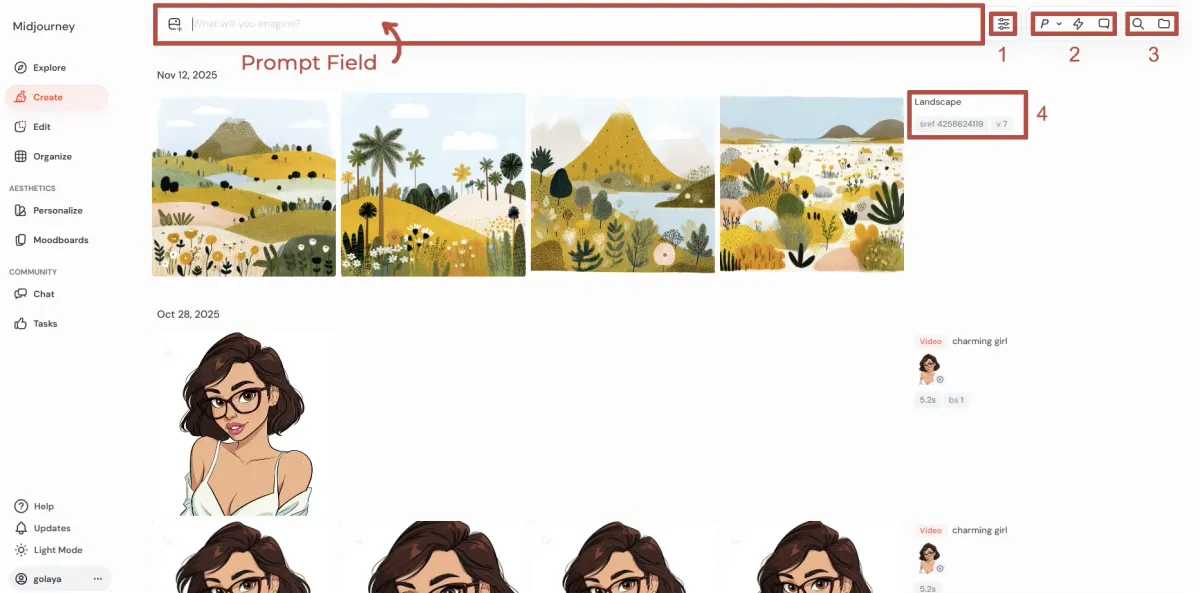
CREATE Tab Overview
This is your main creative space. At the top, there's a prompt field where you type your prompt. On the top right are icons for the main tools. Below, you'll find your recent generations with their prompts and parameters displayed on the right side. Images are generated in grids of 4; batch size for videos is 1–4.

Create Tab Overview
Let's explore the main tools:
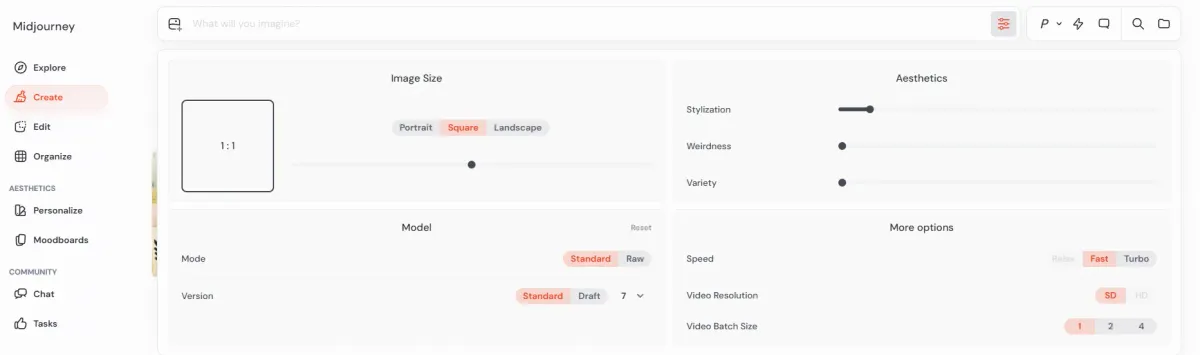
1) Settings (Parameters)
The settings are grouped into four sections:
- Image Size - Adjust the aspect ratio (you cannot change the default image dimensions, as Midjourney doesn't allow this).
- Model - Choose a Mode and Version. Hover over these terms to learn what they mean. Raw mode uses less of Midjourney's built-in creativity, helping you create images closer to your prompt text. Draft mode creates images 10× faster but with significantly lower quality.
- Aesthetics - Tune Stylize, Weirdness, and Variety. In short: higher Stylize values create more complex and sophisticated images; Weirdness produces more unexpected outcomes; and Variety ensures the four images in your result grid differ from each other more.
- More Options - Control Speed and Videos. Relax mode is free but very slow; Fast is the default mode; Turbo is twice as expensive but generates images even faster than Fast. Here you can also switch between SD and HD video modes and select the video batch size from 1 to 4. Note: you cannot create videos in SD quality and then upscale them to HD on the Midjourney website. To get an HD video, you must create it in HD quality mode from the start.
Any changes you make in Settings will be saved for future prompts.
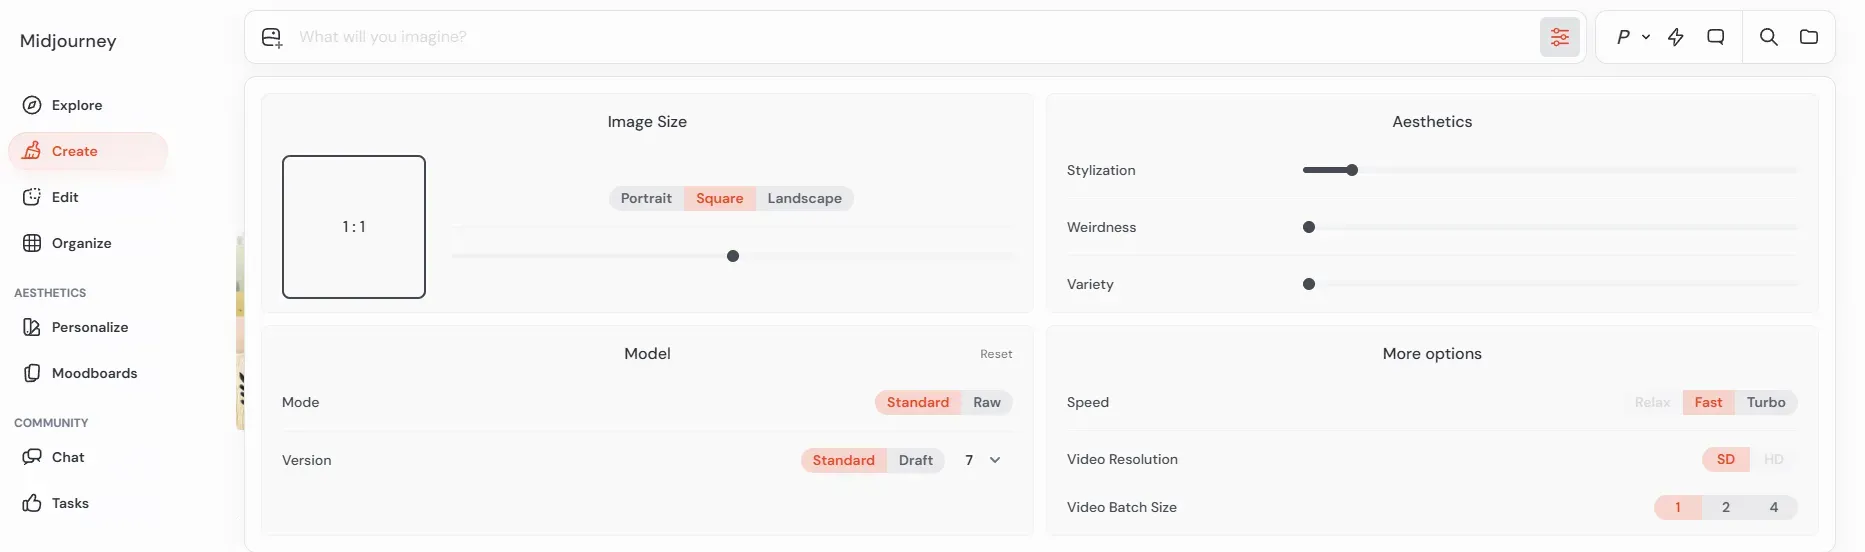
Create Tab - Settings
2) Personalization and Modes
- First, you can turn on Personalization or use one of your Moodboards if you've created them. To enable personalization, you must rate a certain number of images to help Midjourney learn your preferences.
- Second, use the lightning icon to toggle between Standard and Draft modes.
- Third, use the speech bubble icon to turn on Conversational mode and Voice mode. These work together with Draft mode, allowing you to skip typing your prompts and simply speak them aloud. The AI will modify your prompt slightly to be better understood by Midjourney. This mode supports many languages, not just English.
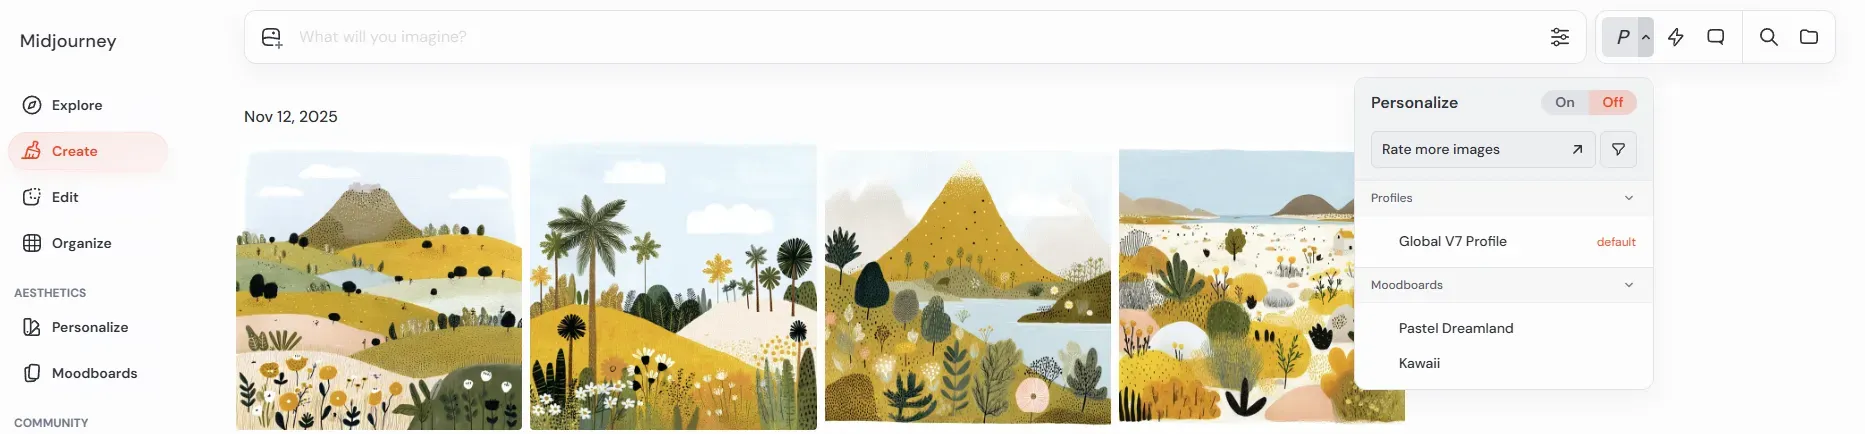
Create Tab - Personalization and Modes

3) Organization
- The Search icon lets you search images among your creations.
- The Folder icon helps you navigate among your folders or create a new one.
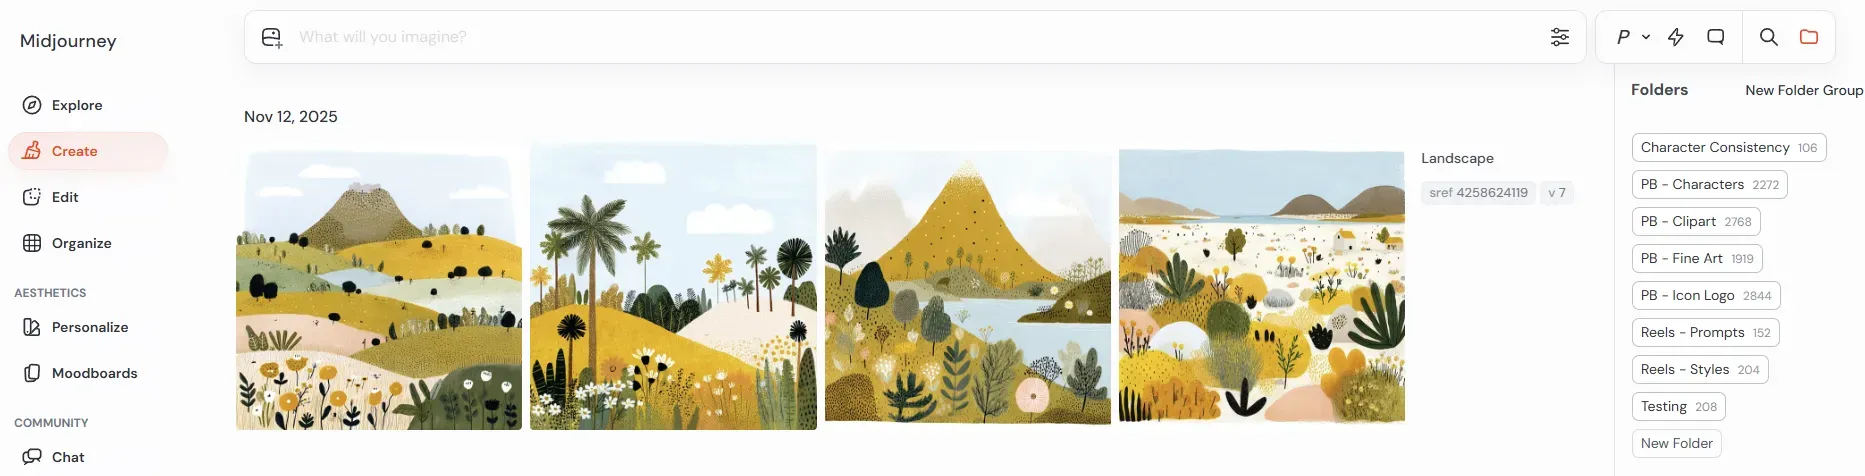
Create Tab - Organization

4) Prompt Details
Here you can see the prompt text and any parameters that were used.
Working with Your Images
After creating your first images, hover over one of them. From here, you can make subtle and strong variations, as well as low-motion auto-animations. If you right-click on the image, you'll see more options.
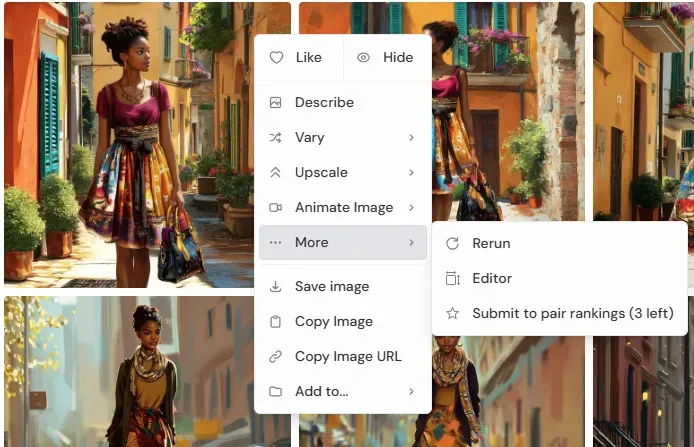
Image Context Menu

- Liking images allows you to find them easily via "Liked" in the Organize tab.
- Putting it in Trash hides them from your main view, but you can find and restore them via the Organize tab.
- Describe commands Midjourney to analyze the image and offer four prompts to re-create it. You can also drag an image from your local device to the prompt area, then to the dedicated area below. We have a great guide on re-creating images you like - don't miss it.

Dragging an Image to the Describe Block

- Vary (strong or subtle) does exactly what clicking it from the hover menu does.
- Upscale (subtle or creative) doubles the dimensions of your image (e.g., 1024 × 1024 px → 2048 × 2048 px). You cannot upscale further, and you cannot upscale uploaded images. When using Creative upscale, Midjourney may add or change some details - this option is better for lower-quality original images.
- Animating images does exactly what it says. Automatic animation doesn't require a text prompt; manual animation does. High motion should be used for fast scenes like car racing or chasing, while low motion has many more use cases. Videos in Midjourney are created from images you generate in Midjourney, link from the web, or upload from your local device. We have a helpful guide on Midjourney video - check it out if you want to learn more.
- Under More, you can find Rerun (runs the same prompt with all its settings again), Editor (sends the image to Midjourney Editor), and Submit to pair rankings. You can earn free GPU hours by ranking images - learn more in our Midjourney Subscription Plans guide.
- Save image, Copy Image, and Copy Image URL are self-explanatory.
- Add to allows you to add the image to one of your existing folders. If you want to create a new folder, do so first using the Organize tab.
If you left-click on an image, you'll open a detailed image view where you can find all available actions.
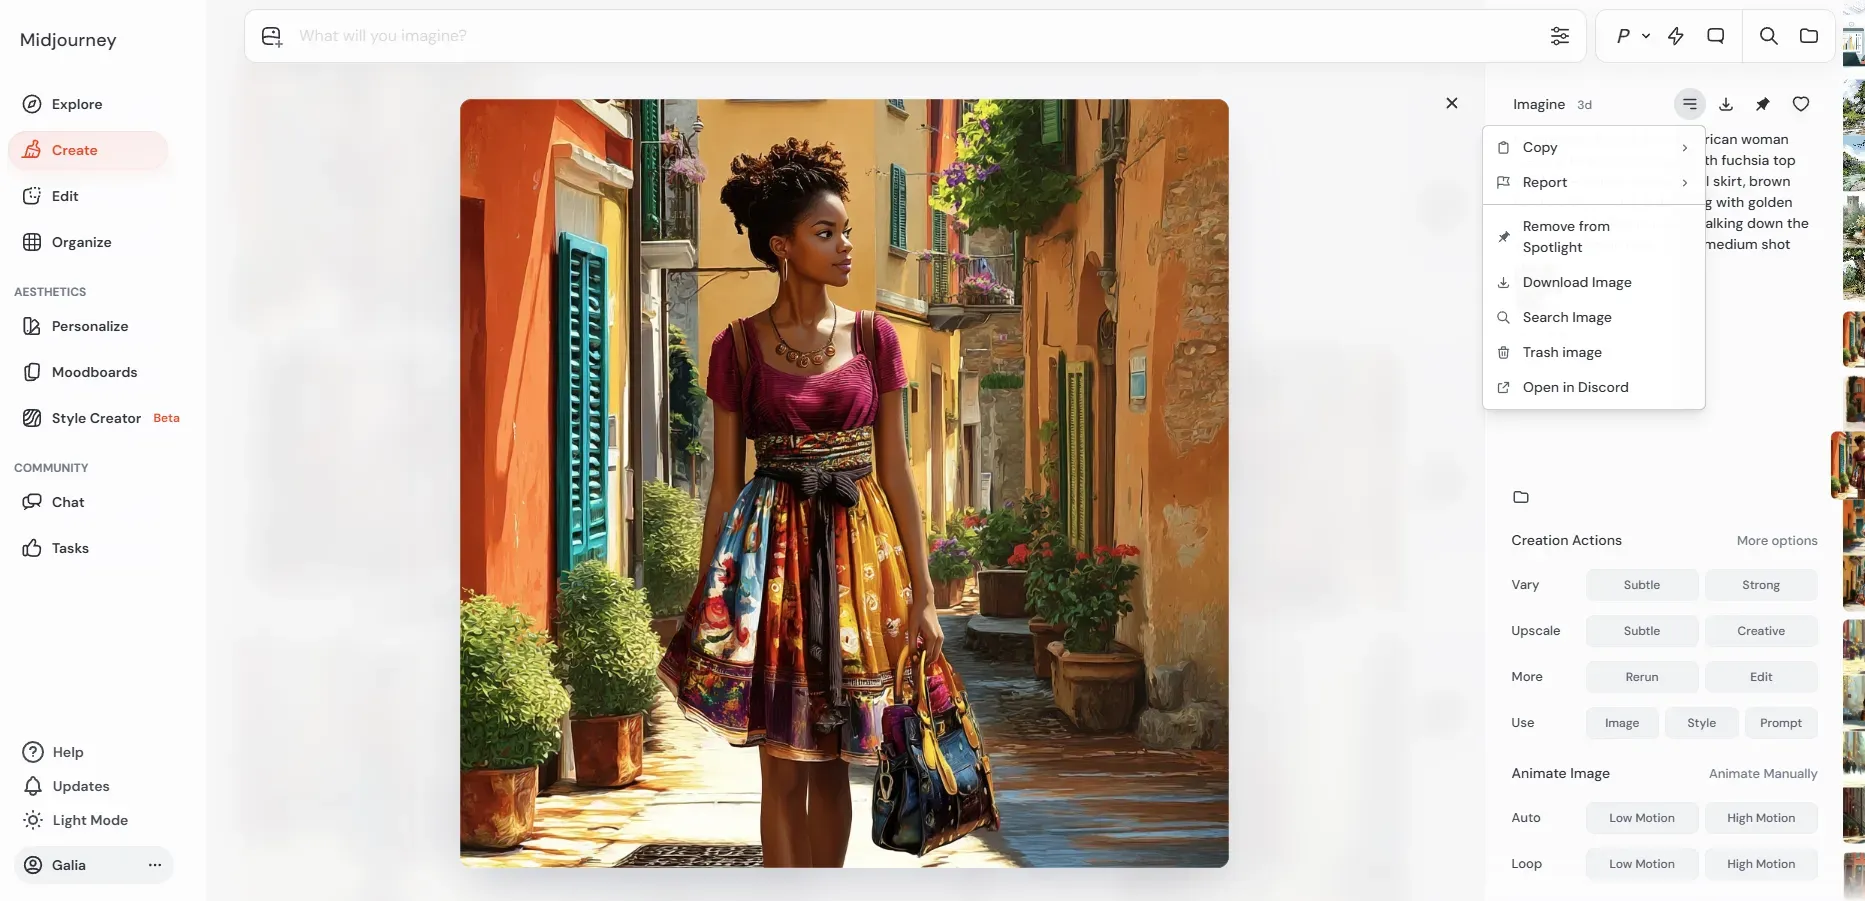
Detailed Image View with All Actions

Many of these repeat the options from the context menu, so we'll skip those. Let's check the unique options. Menu offers you:
- Copy prompt, Job ID, seed, image, or image URL
- Report a policy violation or copyright infringement
- Add or remove the image from Spotlights (featured images on your Profile page)
- Download image is self-explanatory
- Search image searches for style- and composition-wise similar images among all public Midjourney images
- Trash image moves the image to trash (you can undo this later via the Organize tab)
- Open on Discord does what it says
Using Reference Images
If you want to create an image based on a reference - whether for overall composition, style reference, or consistent character variation - you can drag your reference image to the prompt field and place it in one of the slots that appear under the prompt field.

Reference Options When Dragging an Image to the Prompt Area
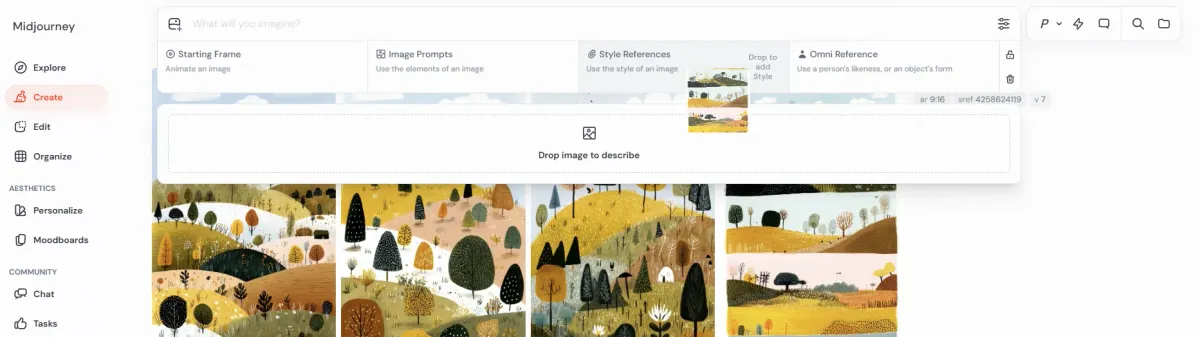
Reference types:
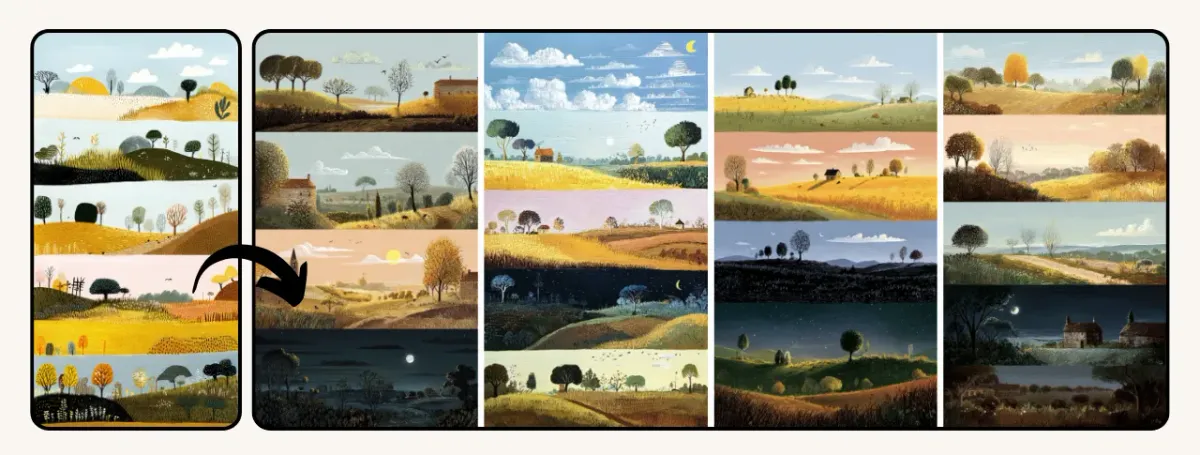
- Image Prompts are for generic or composition reference. You can add multiple images here. In practice, this reference type is the least commonly used, as it's somewhat random and doesn't serve any specific task that other tools don't handle better. If you do use it, make sure your prompt strongly relies on the image you've provided. If your goal is to re-create an image you like, this reference might be very useful - try the Describe method for optimal results.
Prompt: https://s.mj.run/gJ5TXn9M31o A canvas featuring depictions of the four stages of the day located one under another from top to bottom: morning, noon, evening and night. Location: French countryside, same location on each stage image. --ar 9:16
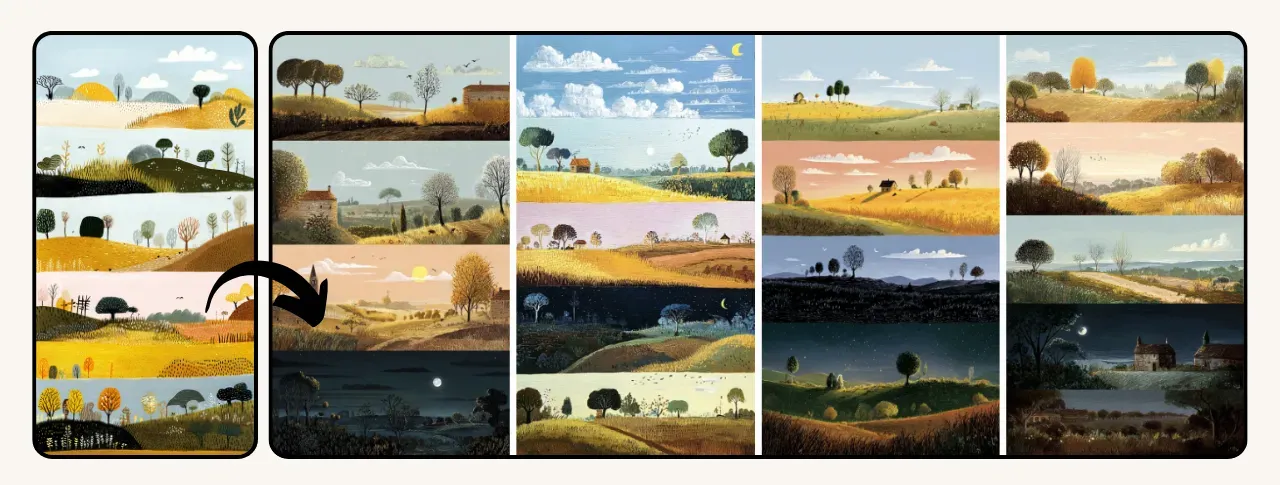
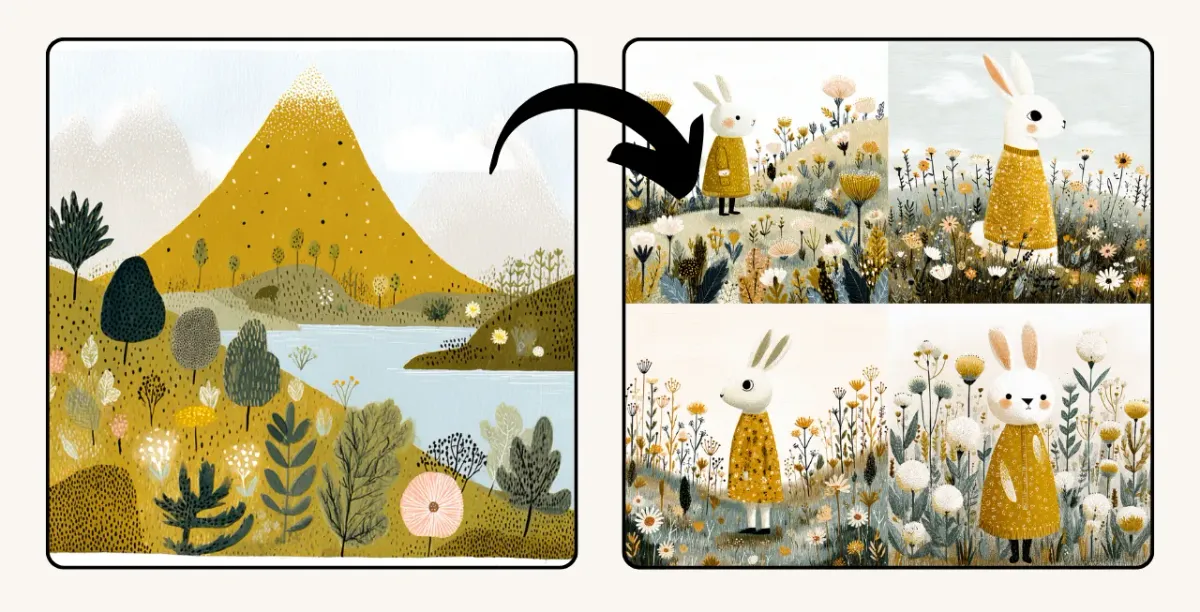
- Style Reference helps you create images in a consistent style and color palette. You can add multiple images here as well. We have a full guide on consistent styles in Midjourney, which we strongly recommend - style variety and controllability are Midjourney's strongest features, setting it apart from competitors.

Prompt: An Easter bunny on a flower field --sref https://s.mj.run/3iL01UBVVlU
- Omni Reference is for creating consistent characters. You can add just one file here, but it can be a collage of multiple images of one character or different objects - see the examples below.

From a Single Reference Image.
Prompt: Illustration of an African American woman walking down the street, medium shot --oref https://s.mj.run/CwL8tZ2KxRQ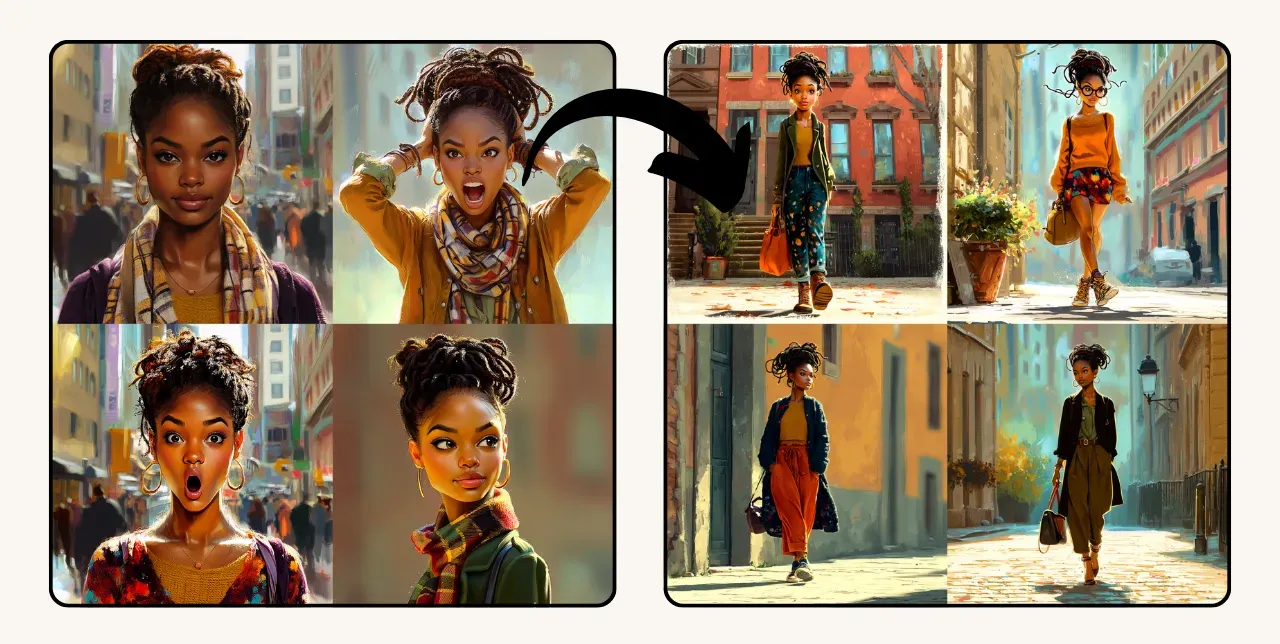
From a Collage of Facial Expressions.
Prompt: Illustration of an African American woman walking down the street, medium shot --oref https://s.mj.run/xC1TAf-kJZg
From a Collage of Different Objects.
Prompt: Illustration of an African American woman wearing bright boho dress with fuchsia top and blue-orange-yellow floral skirt, brown textile belt, holding a dark bag with golden rounds and yellow handles, walking down the street in a small Italian town, medium shot --no sleeves --oref https://s.mj.run/B1vRHAwehXI


When working with collage omni reference, make sure all the images have the same style. You can use your initial image as a style reference as well to create them. A collage with multiple facial expressions will most likely improve your results. On the other hand, when working with collages of various objects, better results come with fewer objects, but still all in the same art style.
For better results with all kinds of references, don't rely solely on the images - add details to your text prompt describing the character and the style.
Related Guides
- What You Can Create With Midjourney
- How to re-create images you like - Midjourney Describe guide
- Midjourney Styles
- Consistent Characters
- Subscription Plans
- Video Basics
Conclusion
If you've covered everything in this guide, you're now on your way to becoming an advanced Midjourney user. Well done - this was quite the deep dive! Keep in mind that true expertise comes with experience, so keep creating, exploring, and experimenting with your prompts to develop your skills. The journey to mastering Midjourney means creating hundreds, if not thousands, of images.
If you want to accelerate your learning, our Prompt Builders are excellent tools for creating and learning interactively. They help you understand prompt structure while generating professional results from day one.
Have questions? Feel free to message us on Etsy - we're always here to help!
Happy creating!
Yes, it's finally available - Midjourney for free with Meta! The image model used by Meta appears to be Midjourney version 7. We'll update this section if using Midjourney on Meta becomes unavailable or if conditions change.
Video guide "Use Midjourney FREE on Meta AI (No Subscription Needed!)"
Onboarding
Step 1. Log in
Go to meta.ai and Log in to your Meta account. That's it - you're in.
Step 2. Start Creating
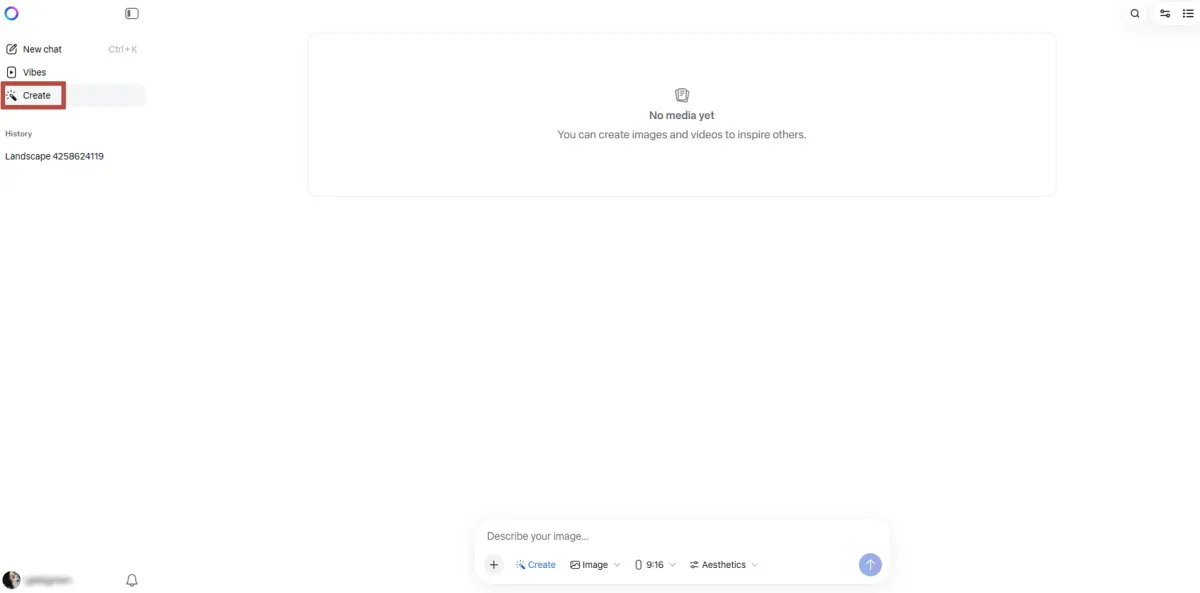
You can start in a New chat window or go to the Create tab and begin there.
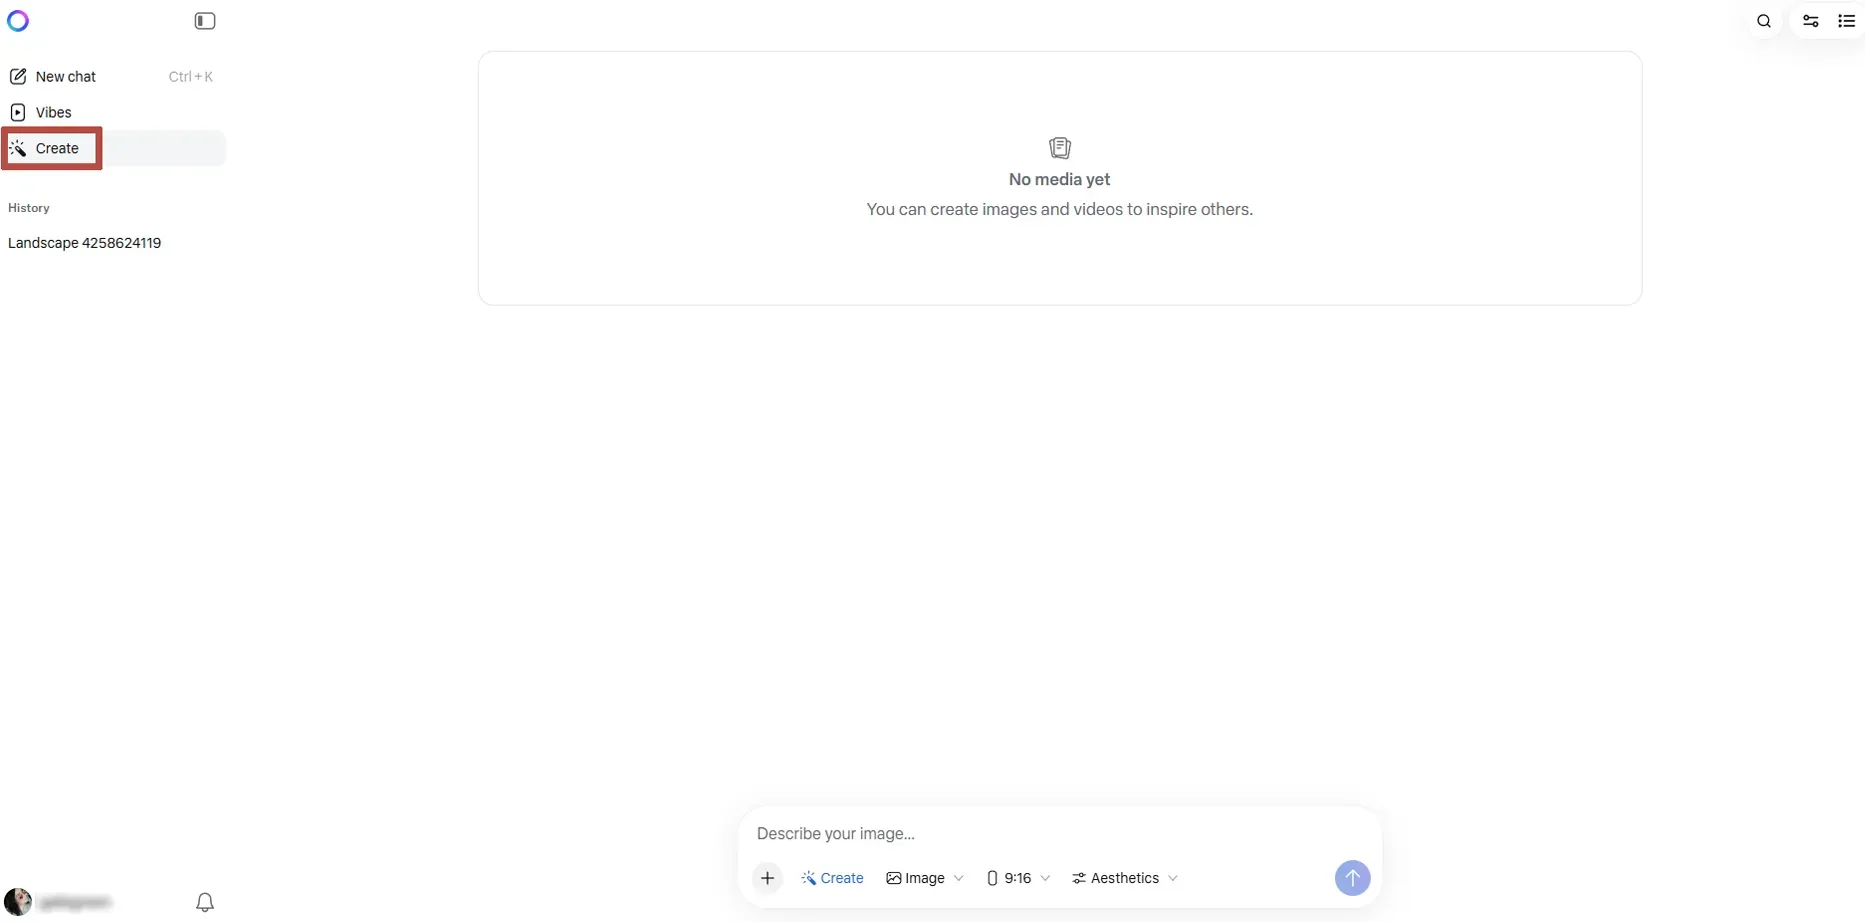
Meta Create Tab
Congrats! You're ready to use the Prompt Builder if you've already purchased one. Just make your selections in the dropdown lists, copy the generated prompt, and paste it into the Meta AI prompt field.
At the bottom, you'll see a prompt field with several menus. Here's what each one does:
- Plus button: Add an image or video to start from
- Image dropdown: Switch between Image and Video
- 9:16 dropdown: Choose the aspect ratio
- Aesthetics menu: Fine-tune Variety, Weirdness, and Stylization values

All Settings for Images

Available Features
Starting with an Existing Image or Video
This is the Edit mode, which lets you modify existing images and videos, including animating them. When you import a file, the menu becomes more compact.
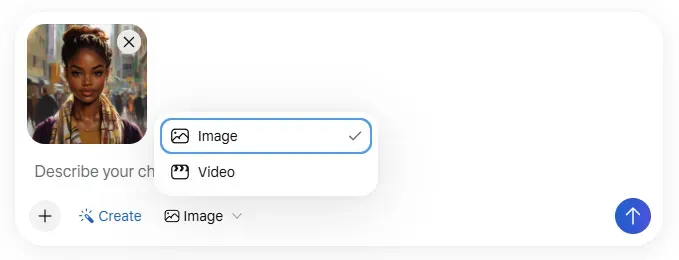
Settings for Editing Images

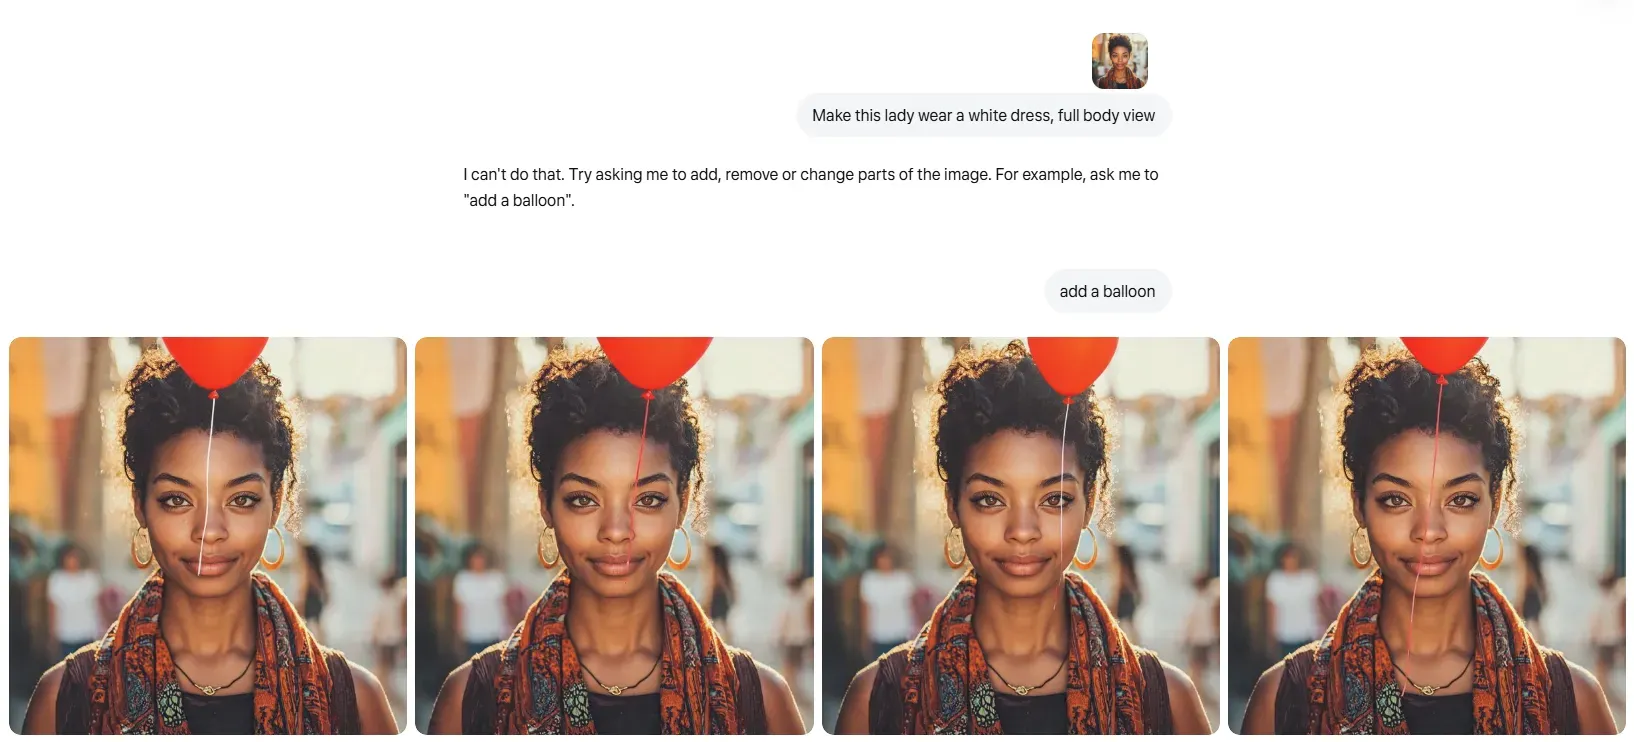
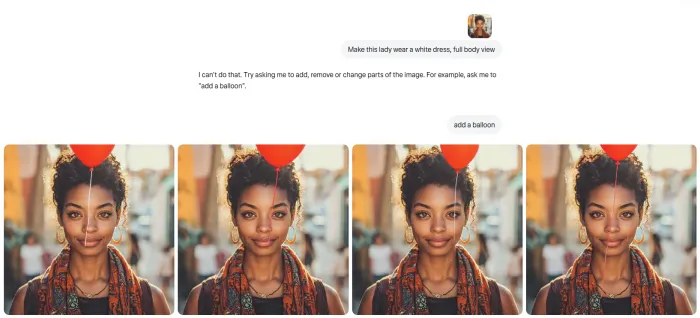
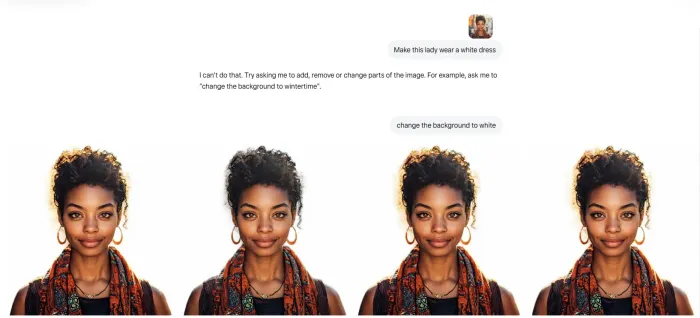
For images, you can ask the AI to add, remove, or change parts of the picture. For example, you can ask it to "add a balloon." You can also animate the image by choosing Video in the corresponding dropdown. This mode is quite limited:
- You can add objects, but they may not fully interact with the rest of the scene
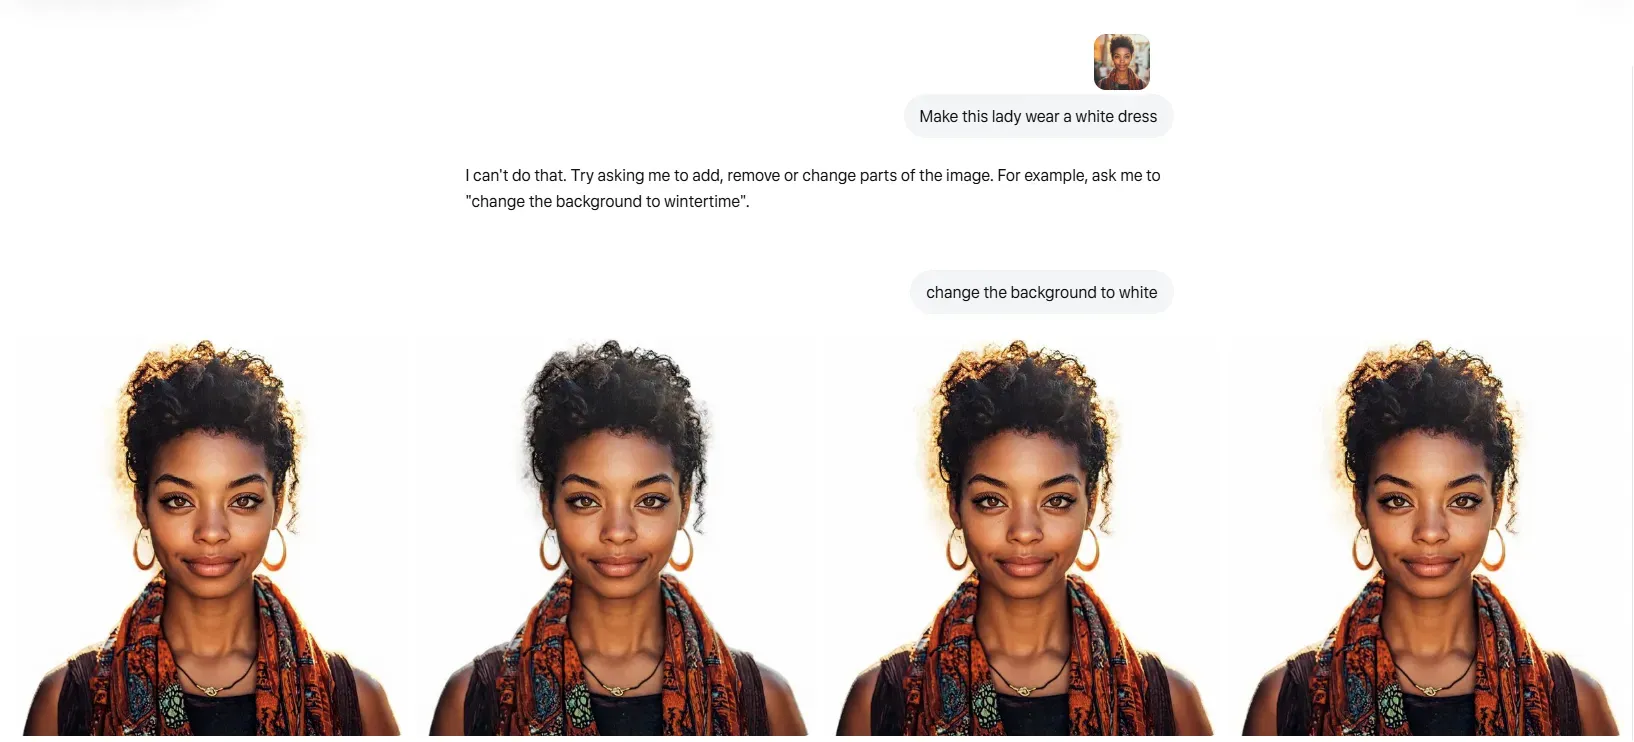
- Changing the background is possible
- More complex edits, like changing a character's outfit or pose, didn't work well in testing
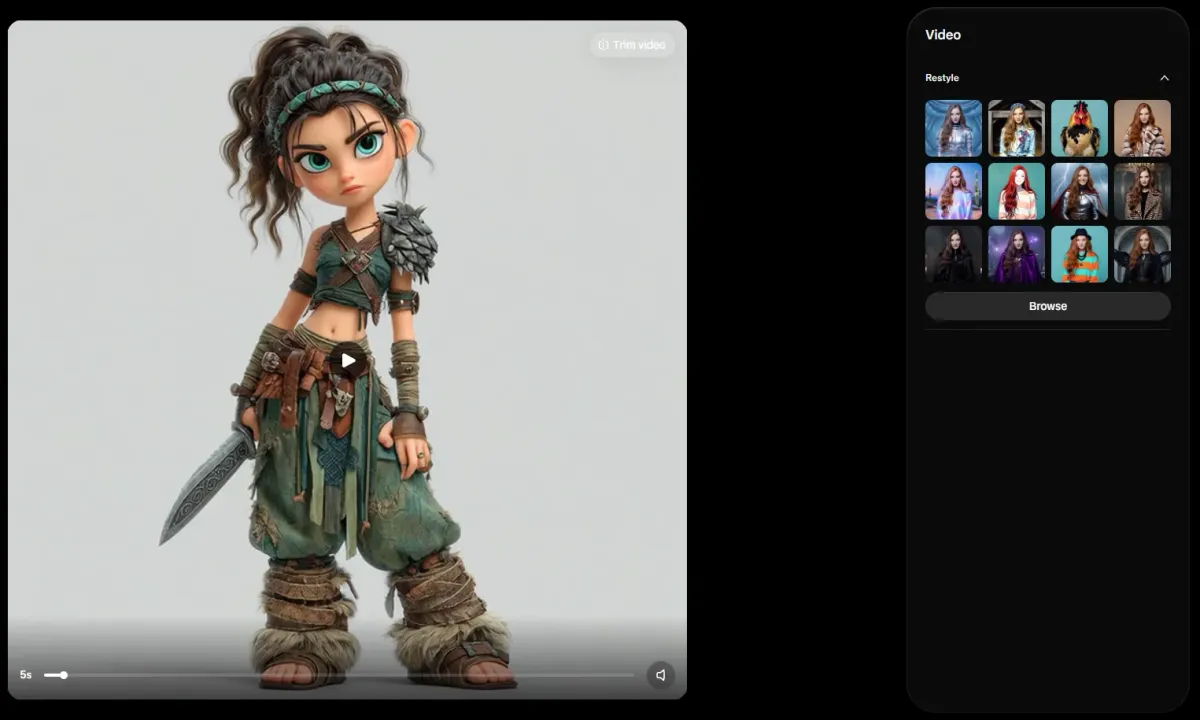
If you upload a video, you can trim it or restyle it using preset styles from the library.

Editing Uploaded Videos
Starting from Scratch
You can create images in Meta with just a text prompt. The output images are in JPEG format (Midjourney's official website uses PNG), and the resolution is slightly different. All traditional Midjourney parameters that you can usually type manually in the prompt are ignored - the few available options are all accessible through the menus.
Editing options for created images include:
- Restyling using the preset library
- Adding elements
- Animating the image with or without a prompt


For videos, you can work both ways:
- Text-to-video - Create a video from scratch. If you only write a text prompt without providing an image (starting frame), the AI will first create an image from your prompt and then animate it.
- Image-to-video - Animate an existing image
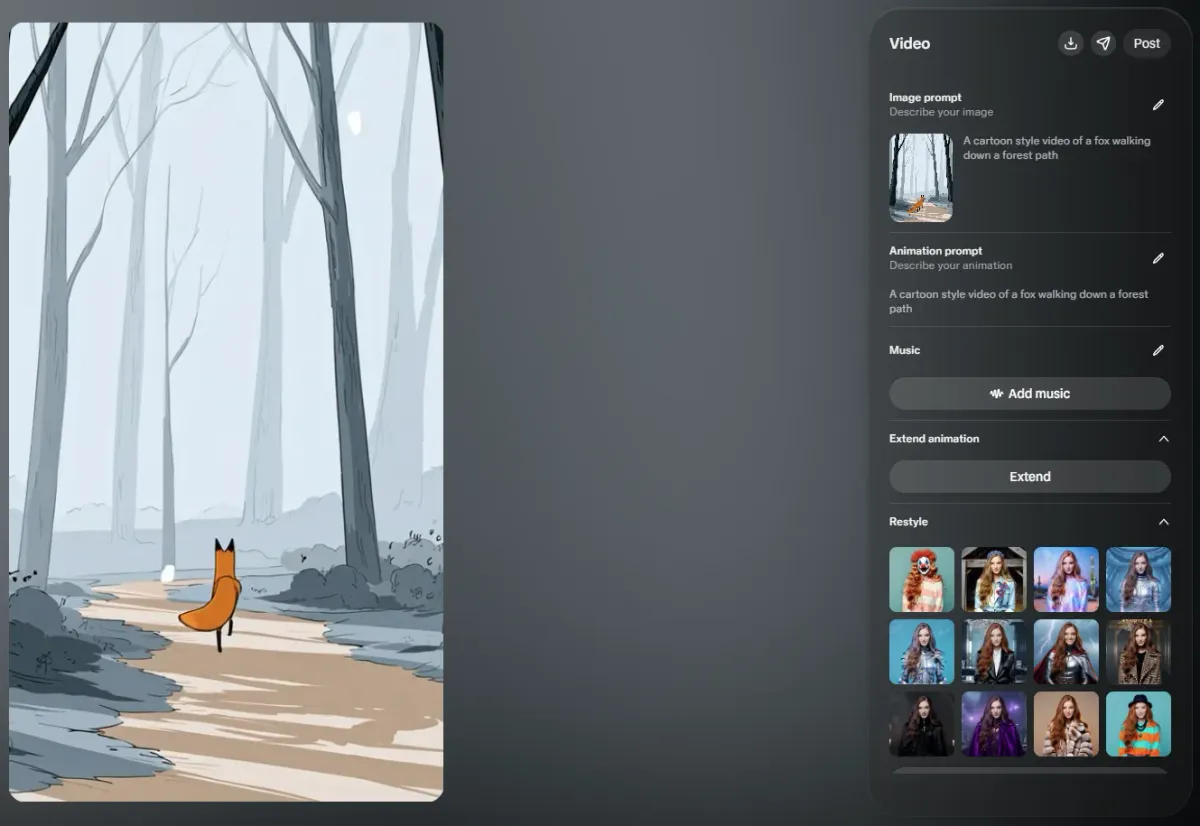
For created videos, you can:
- Change the prompt for the starting frame (creates a new starting image)
- Change the prompt for the animation (creates a new animation from the same starting frame)
- Add music from a large built-in library
- Extend the video by adding a new segment (though you can't write a separate prompt for that segment)
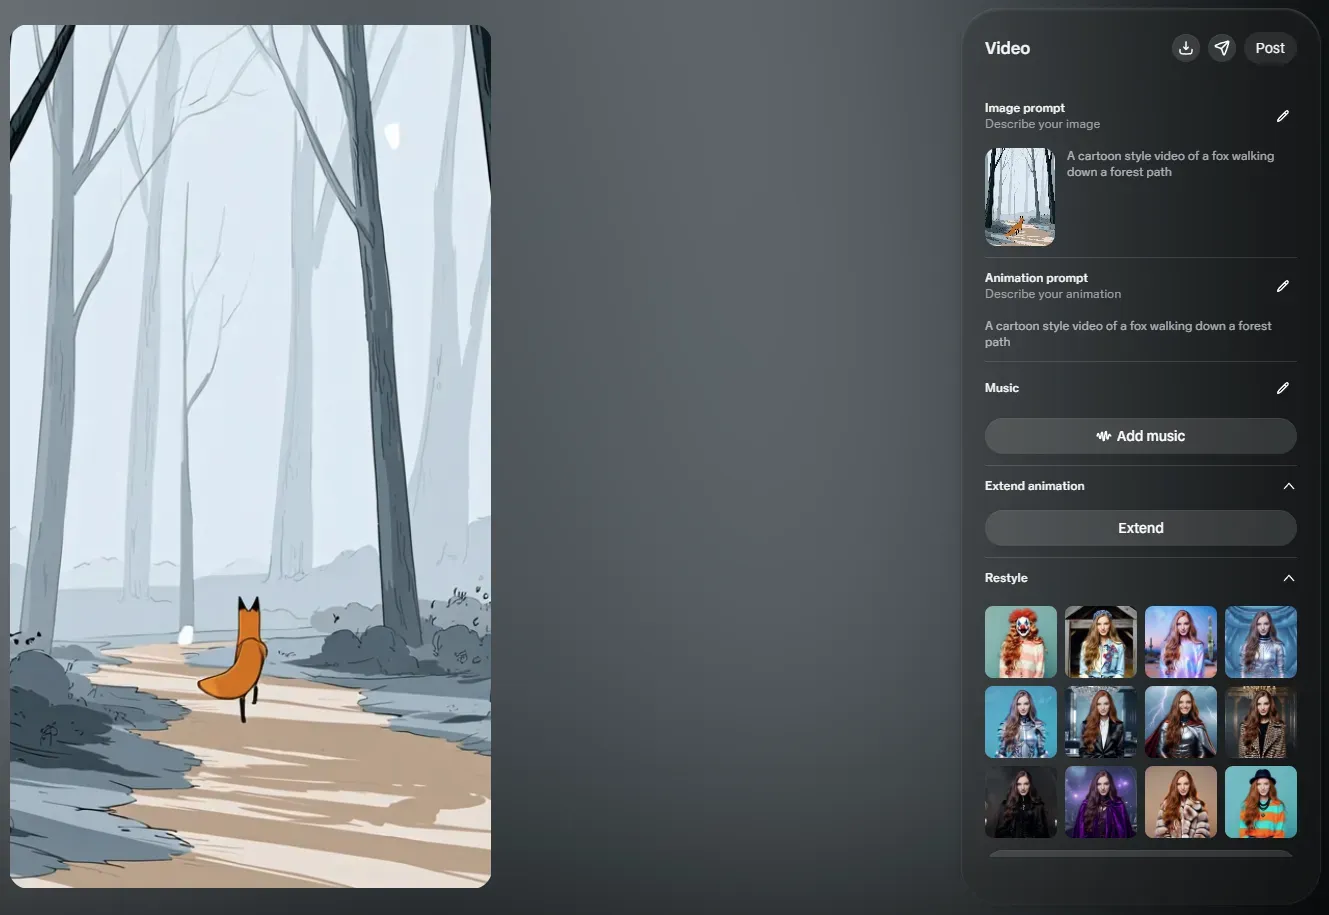
Editing Created Videos
Picking Aspect Ratio
Only three aspect ratios are available:
- 9:16 (vertical)
- 16:9 (horizontal)
- Square (1:1)
Currently, you cannot set a custom aspect ratio with the --ar parameter manually.
Modifying Aesthetics
In the Aesthetics menu, you get sliders for Variety, Weirdness, and Stylization, plus a field for a style reference code:
- Variety: How different the four output images are from each other
- Weirdness: How unexpected, quirky, or experimental the images can be
- Stylization: Higher values create more complex, detailed, and "artistic" images
- Style reference seed (SREF code): A numeric value linked to the Midjourney style library, which contains almost 10 billion styles. This library is available on the official Midjourney website and is fascinating to browse, but you can't access it without a paid Midjourney subscription. On Meta, you can use a random 10-digit number as a style seed or use a style code you already know.
Note: Moodboard codes are not supported on Meta. Style reference images and character reference images are also not supported.
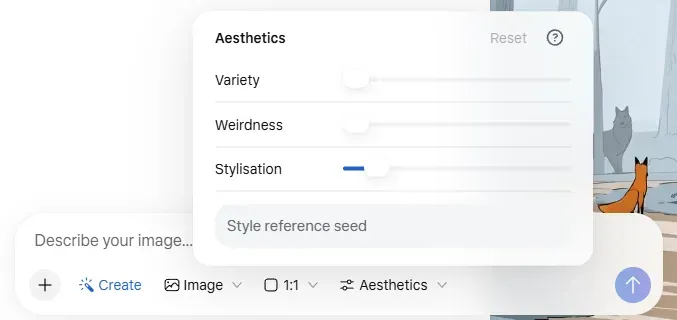
Aesthetics Menu

Midjourney on Meta - How Does It Compare?
This is a personal assessment based mainly on comparisons with the official Midjourney website:
- Image creation from scratch: ★★★★☆
- Image creation from reference images: Not available
- Image editing: ★☆☆☆☆
- Re-creating images (/describe workflows): Not available
- Consistent characters: Not available
- Consistent styles: ★★★☆☆
- Video creation and editing: ★★★☆☆
Overall, Midjourney on Meta is absolutely worth trying - it's free, after all! It's especially good for beginners who aren't yet familiar with native Midjourney features. If your main goal is simply to create images from scratch, Meta AI is a comfortable playground for experimentation.
Happy creating!
If you're unfamiliar with Discord, we recommend using Midjourney on its official website since it's more functional. If you already have a verified Discord account and the app installed, you can move directly to Step 3. If you're familiar with creating and organizing your own server, feel free to skip Step 5.
Starting on Discord
Step 1. Install the Discord app (optional)
If you prefer using the browser version, you can skip this step. Discord account is free, and we recommend installing the app since you'll be using it frequently when working with Midjourney. Although the browser version works the same, the app has a few advantages and is generally more comfortable to use.
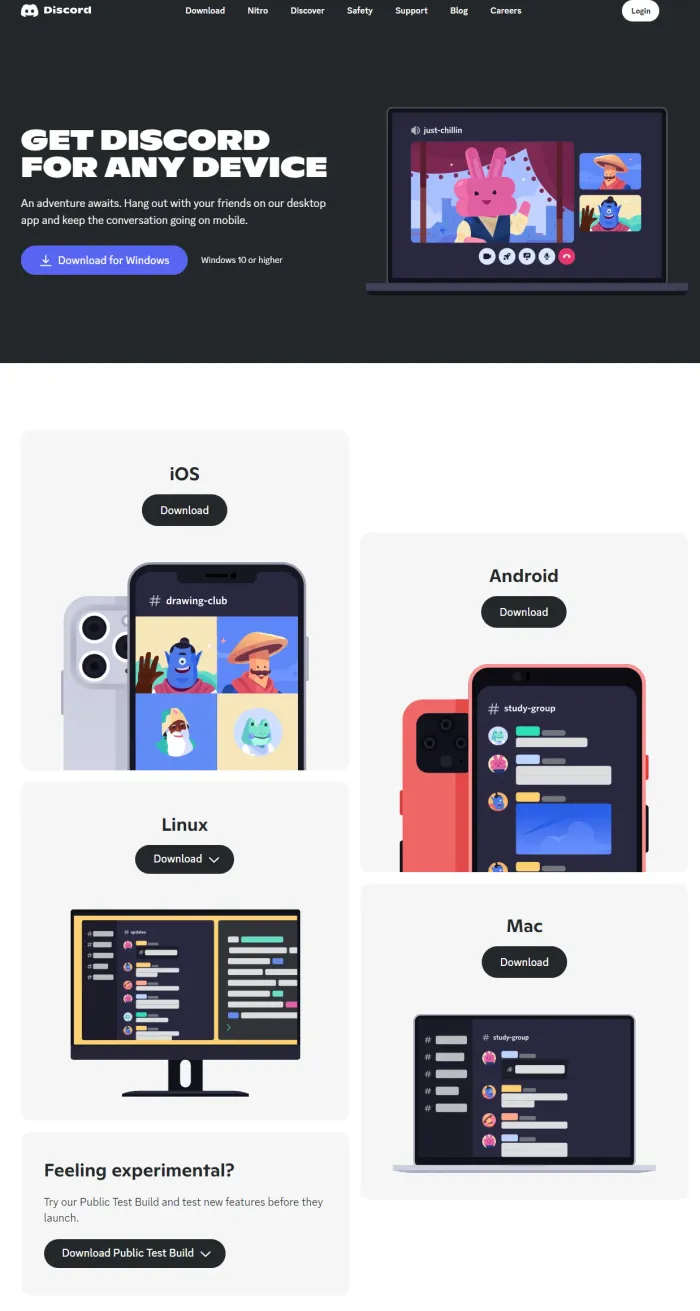
To install the Discord app, visit: https://discord.com/download
Choose the appropriate download file based on your system: Windows, Mac, iOS, Android, or Linux. Discord allows you to use the app on multiple devices and sync your data across them. Once the setup file is downloaded, navigate to your Downloads folder and begin the installation. On Windows, double-click DiscordSetup.exe. For Mac, drag DiscordSetup.dmg to the Applications folder.

Discord app installation options
Step 2. Register
You need a verified Discord account to join the Midjourney Discord server. After installing the Discord app on your computer or phone, create your account and log in. Discord's safety system requires that you verify both your email and phone number before accessing all features.
Step 3. Join Midjourney Discord server
Once your Discord account is ready, add the Midjourney server to your server list.
Click the "+" button at the bottom of your server list (left side of the app screen) and select Join a server. Paste this link: http://discord.gg/midjourney and click Join server.
Now the Midjourney Discord server will be part of your server list. Although we won't create images directly on this server, it's useful to follow two channels here:
- 📢 Announcements: stay updated with the latest features and news. Alternatively, check updates on their website: Midjourney Updates.
- 🛠 Status: check for any ongoing technical issues. Alternatively, monitor the status here: Midjourney Status.
Step 4. Subscribe
Midjourney is a paid AI tool with no free daily tokens or trial period, though free trials are offered occasionally. To use Midjourney, you'll need to choose a subscription plan. Midjourney currently offers 4 subscription plans: Midjourney Plans.

Midjourney subscription plans
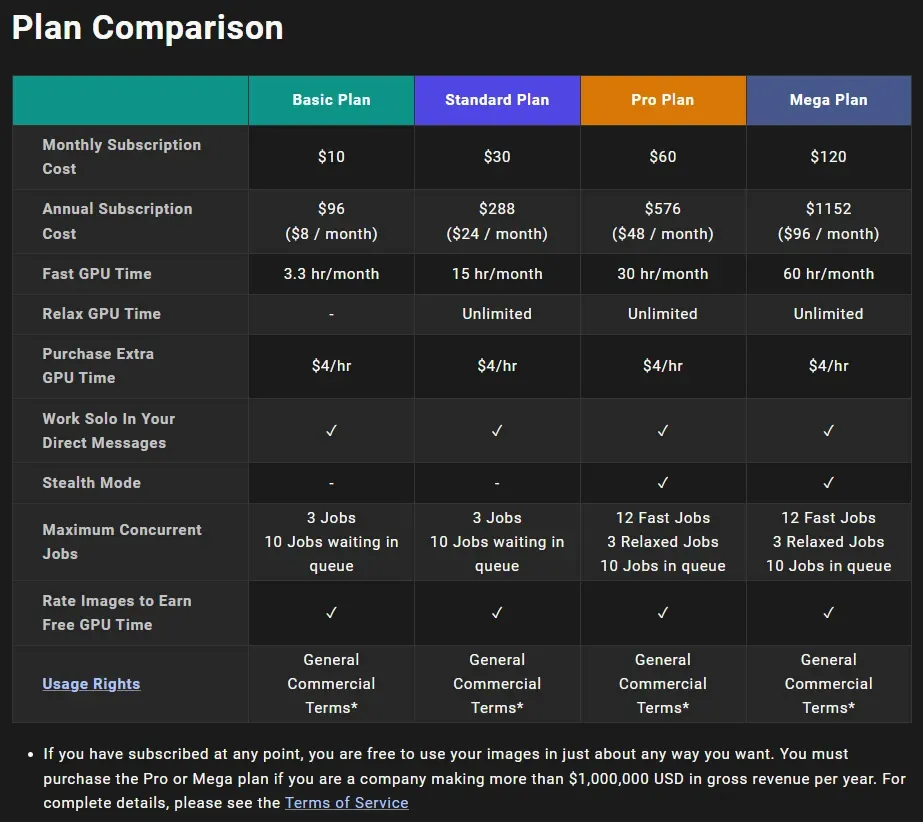
We recommend starting with the Basic plan (monthly payments), especially if you're unsure whether you'll continue using Midjourney long-term. The Standard plan offers more GPU time (image generations) and unlimited generations in Relax mode (slower speed) once your Fast hours expire. The Basic plan doesn't include Relax mode, but you can upgrade to Standard later if needed.
Step 5. Create a Private Discord server
Using Midjourney in your private server is more convenient, allowing you to avoid seeing others' images and organize your work in folders.
To create your own server:
- Open the Discord app
- Press the "+" button at the bottom of your server list (left side of the app screen)
- Select Create my own server and follow the on-screen directions

Discord new server creation

Now that your private server is ready, you can organize your workspace. Discord allows you to create folders (Categories) and subfolders (Channels):
- Choose your new private server from the server list
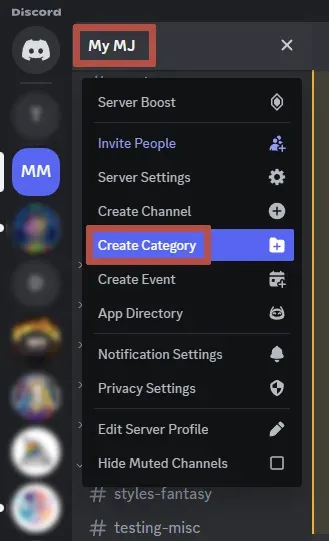
- Click its name at the top left to access the server menu
- Select Create Category to add your first folder
- Create text channels by pressing the "+" button next to the Category name
Note: You cannot move messages between channels - only copy and paste. It's helpful to plan your workspace in advance.

Discord server menu
You can also work with the Midjourney Bot directly via private messages, but this limits your ability to organize images into folders, which can become a problem when managing hundreds or thousands of images.
Step 6. Invite Midjourney Bot

Midjourney Bot menu
Now it's time to invite the Midjourney Bot to your private server. Follow these steps:
- In the Midjourney Discord server, locate the Midjourney Bot in the Member List on the right side of your screen.
- If the Member List isn't visible, click the Users icon in the top-right corner to display it.
- Click on the Midjourney Bot's name.
- Press + Add App => Add to server => select your private server => Authorize.

Step 7. Create your first image
You're almost there! Now that the Midjourney Bot has been added, its commands are automatically available on your private server. When you begin typing in the text field, Midjourney commands will appear as suggestions above it. The command to create images is /imagine. Here's how to create your first image: type /imagine followed by any prompt you want.
Upon your first image generation, Midjourney Bot will display a pop-up asking you to agree to the Terms of Service. You must accept these terms before your image will be generated. Note: Images are generated in a grid of four. The amount of generated images cannot currently be changed.
That's it! Now you can use the Prompt Builders to create stunning images with Midjourney. Simply construct your prompts using the Prompt Builder, then paste them after the /imagine command in your private server.
If you want to explore more features of Midjourney, continue reading!
Discord: Advanced Guide - Midjourney Commands and Parameters
Image Grid Toolbar
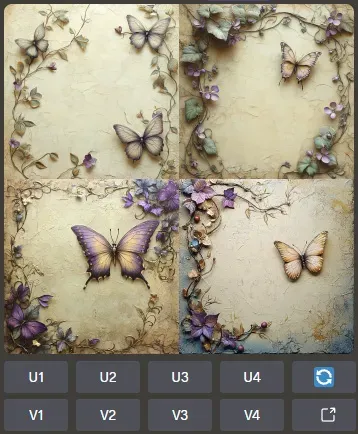
After processing your text prompt, Midjourney generates images in grids of four, as shown in the image below:

Image grid in Discord
In the image grid interface, you will find 10 buttons:
- U1, U2, U3, U4: These are the upscale buttons, allowing you to extract the individual image you like from the grid. This action doesn't consume any GPU time, as it doesn't enlarge the image; it just pulls it from the grid into its own standalone view.
- V1, V2, V3, V4: These buttons create variations of the selected image. Variations generate a new grid based on the chosen image's style and composition. Variations can be Subtle or Strong. Subtle variations closely resemble the original image, while Strong variations have more noticeable differences. You can set your default variation style in the Settings menu.
- 🔄 Rerun: This button will rerun the job, creating a new image grid from the original prompt. If the Remix Mode is enabled in the Settings menu, you can modify the prompt before rerunning.
- Web: Clicking this button will open the image on the Midjourney website.
Single Image Toolbar
Once you've upscaled an image from the grid, you can save it by following these steps:
- On Desktop: click the image to view it in full size, open it in your browser, then right-click and choose "Save image"
- On Mobile: long-tap the image, then tap the download icon in the top right corner.
Here's how the toolbar of an upscaled single image looks:

Single image after extracting it from grid in Discord
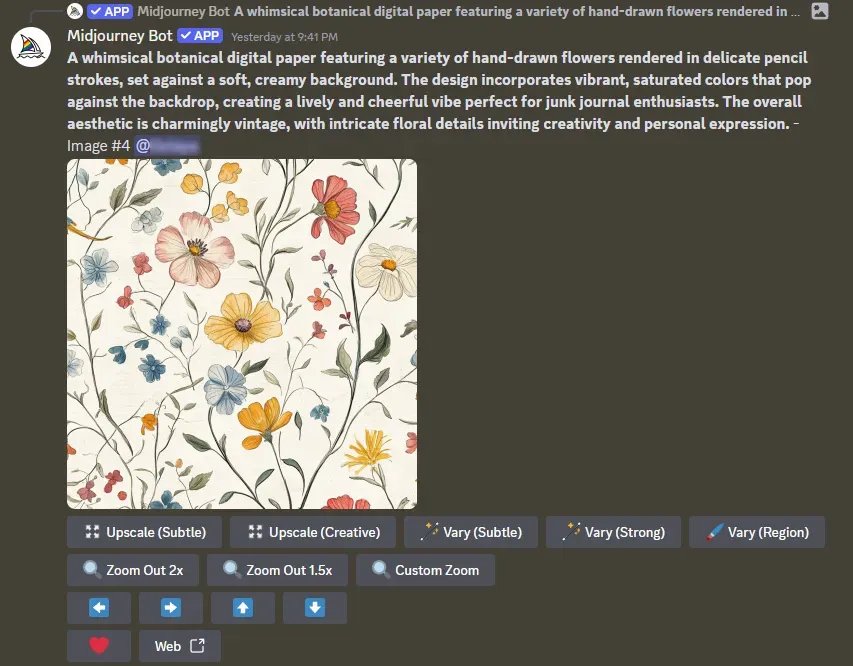
You will see 14 buttons:
- Upscale: This will double the size of the image (x2). Subtle Mode preserves the original details as much as possible. Creative Mode allows Midjourney AI to add missing details or enhance unclear areas.
- Vary (Subtle) and Vary (Strong): These buttons generate variations based on the selected image, following the same Subtle or Strong logic.
- Vary (region): This is used for inpainting. Clicking this button opens the image in a new window, where you can use Rectangle and Lasso tools to select a specific region to modify. For example, if you want to adjust your character's face, you can select the face and leave the original prompt. To change the character's hair color, select the hair area and input a new prompt describing the desired color. The selection should be rough and larger than necessary to give the AI enough freedom to generate better results.
- Zoom Out: This pulls the "camera" back, adding details on all sides of the image. It's particularly useful for getting a wider view and expanding your image's environment, especially if Midjourney generates close-ups by default. Custom Zoom allows prompt modifications during zooming. If your image isn't square, you'll also have the option to Make it square.
- Pan ➡️⬅️⬆️⬇️: These arrows allow for extending in any direction, similar to zooming out. You can modify the prompt if Remix Mode is enabled.
- ❤️: This button lets you like the image, marking it as a favorite.
- Web: Opens the image on the Midjourney website.
Midjourney Discord Commands
For the full list of commands, check the Official Documentation. Below is a guide to some of the basic and most essential commands you'll need when using Midjourney:
- /info - This command provides detailed information on your account, including:
- Fast GPU hours remaining
- Billing date
- Statistics about your image generations (e.g., number of images generated, GPU usage, etc.).

Midjourney settings
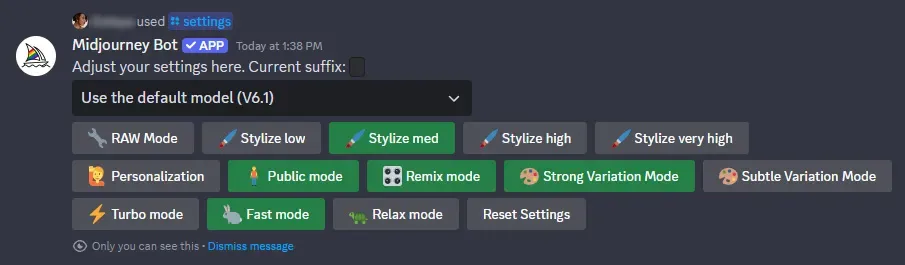
- /settings - Use this command to customize your Midjourney experience. Here's a breakdown of the key settings:
- Model: By default, Midjourney uses its latest model. Unless you need something specific, stick with this for the best results. Niji models are optimized for anime-style art.
- Raw Mode & Stylize: Raw Mode controls how strictly the AI follows the given prompt. Stylize adjusts how much creative interpretation the AI applies to the prompt. The default is Medium, and we recommend leaving it there, though you can adjust the Stylize value per prompt as needed.
- Personalization: Turning on Personalization makes Midjourney create images with your artistic preferences. To activate this feature, go to the Midjourney website and rate at least 200 image pairs. This allows the AI to tailor future generations to your tastes.
- Public Mode: By default, all your image generations are public, but if you have a Pro or Mega subscription, you can enable Stealth Mode to keep your creations private.
- Remix Mode: We strongly recommend enabling Remix Mode. This allows you to edit the prompt when making variations of an image, giving you more control over the final result.
- Variation Style: You can choose between Strong or Subtle variations. The difference affects how close or different the new variations will be from the original image.
- Turbo, Fast, and Relaxed Modes:
- Fast Mode is the default setting
- Turbo Mode generates images quicker but consumes twice the GPU time
- Relaxed Mode generates images significantly slower but uses no GPU time, making it ideal for preserving fast hours.
- /describe - This command is useful when you want Midjourney to create an image similar to one you already like. You can either drag and drop an image into Discord or provide a link to an image online. Midjourney will generate 4 prompts based on the image you provide. Though this feature is not perfect, it's a great starting point for beginners.
- /subscribe - This command generates a personal link to your Midjourney account page, where you can manage or change your subscription plan.
Midjourney Parameters
For the full parameters list, check the Official Documentation. Below are the most essential parameters you'll need for Midjourney. Parameters must be placed at the end of your prompt, each starting with two dashes (--) and requiring a space before them. The order of parameters doesn't matter.
- Version (e.g., --v 6,1 or --niji 6) - Sets the Midjourney version used by the AI. If no version is specified in the prompt text, the version selected in your settings is used by default.
- Stylize (e.g., --s 300) - Controls the creativity level of the AI. The range is 0 to 1000, and the default value is 100. Higher values create more intricate, detailed images, while lower values produce more photorealistic outputs.
- Style Raw (e.g., --style raw) - Reduces automatic beautification, making the image more accurate to the prompt and generally more photorealistic if the prompt aligns with that style.
- Aspect Ratio (e.g., --ar 9:16) - Sets the width-to-height ratio of your image. Only whole numbers are allowed (e.g., use 125:100 instead of 1.25:1). Some common aspect ratios:
- 1:1 for a square
- 9:16 for a vertical rectangle
- 16:9 for a horizontal rectangle
- Seamless pattern (e.g., --tile) - Generates images that can be used as repeating tiles for seamless patterns.
- Negative Prompting (e.g., --no hat, glasses) - Tells Midjourney to exclude certain elements from the image. You can list multiple items, separated by commas, but use this parameter only once per prompt.
- Style Reference (e.g., --sref URL or --sref number) - Allows you to use an image as a style reference to maintain style consistency in your collections. Use either an image link or a Midjourney style code (numbers) in this parameter. Multiple links or numbers can be used, separated by a space.
- Image link: copy the link of the image on the internet, or drag and drop the image to Discord, right click and Copy link.
- Style code: To generate your own style code, add --sref random to a prompt, and the output will contain a usable code. You can also use ready SREF codes from other creators. Currently it's not possible to extract a style code from the image or prompt that initially doesn't have one.
- Character Reference (e.g., --cref URL) - Allows you to use an image as a character reference, helping create consistent characters in various situations. For better results, the reference image should be created in Midjourney. You can use multiple links, separated by a space.
- Reference Image Weight (e.g., --iw 2, --sw 3, --cw .5) - These parameters control how much influence a reference image has on the final result:
- Generic Image weight. The link will be located at the beginning of the prompt, influencing the overall style, color and character appearance. --iw goes to the end of the prompt together with other parameters (default = 1, min = 0, max = 3).
- Style weight. Adjusts the influence of the image linked with the --sref parameter (default = 100, min = 0, max = 1000).
- Character weight. Manages how closely the AI follows the character reference. Lower values allow experimentation (e.g., with hairstyles), while higher values ensure maximum consistency (default = 100, min = 0, max = 100) in face, hair and clothes.
Conclusion
If you've covered everything in this guide, you're now on your way to becoming an advanced Midjourney user. Well done - this was quite the deep dive! Keep in mind that true expertise comes with experience, so create, explore, and experiment with your prompts to develop your skill. The journey to mastering Midjourney lies in creating hundreds, if not thousands, of images.
For more inspiration, join our Youtube channel where we share guides, prompting techniques, and announce new Prompt Builders. If you have any questions, feel free to message us on Etsy or through Instagram DMs!
Midjourney Important Facts
- The default square image size is 1024 x 1024 px, with grid images being 2048 x 2048 px. This is not modifiable.
- Upscaling images is available in Subtle and Creative modes; Upscale uses a lot of GPU time but produces excellent results.
- Midjourney does not currently support transparent backgrounds or a background removal feature.
- Images created on Discord are visible on the Midjourney website, but the reverse isn't true - website images don't appear on Discord.
Happy creating!